hide's memo
11 8月, 2025

SAMLのSPをIISでホストする(IDPはSustainsys のスタブIDPを使用)

[English]

Microsoft .NETの webapp でSAMLのSPを作成し、IISでホストする手順。
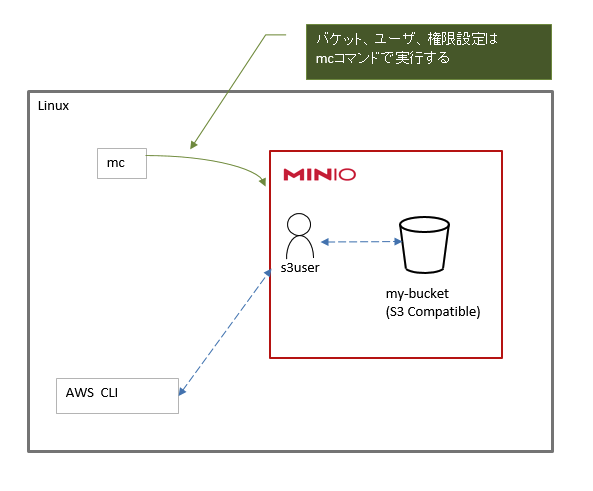
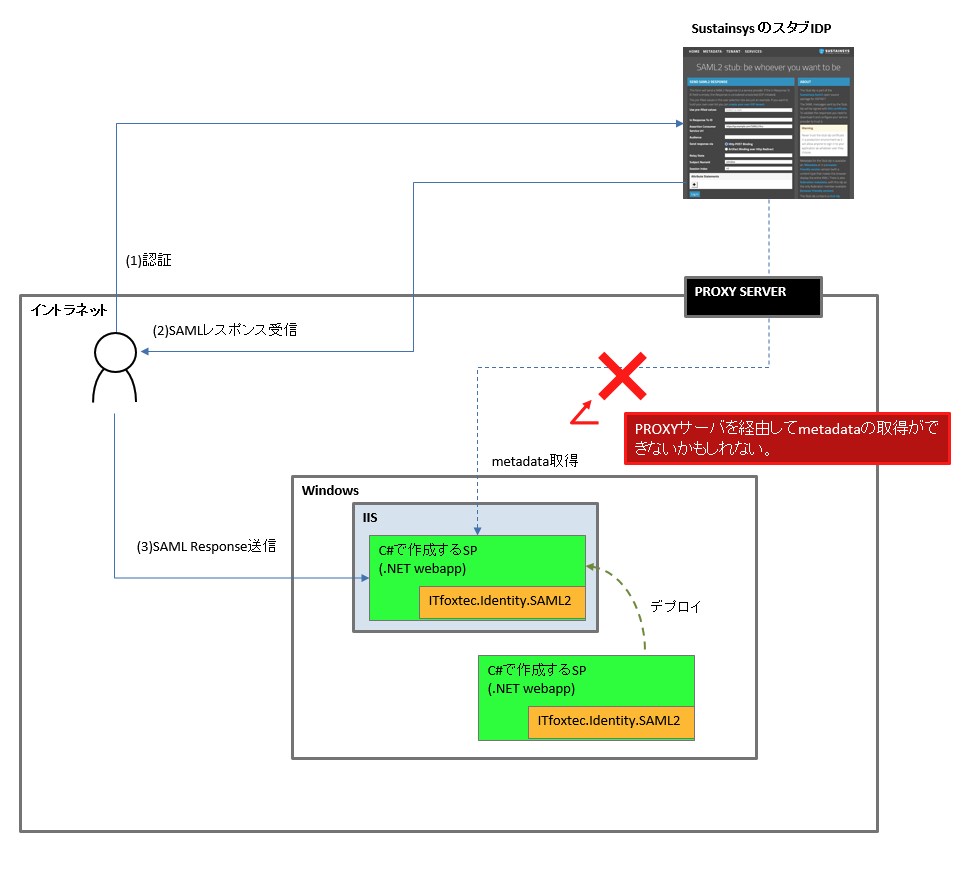
IDPはSustainsys のスタブIDPを使用し、下図のような構成を作る。
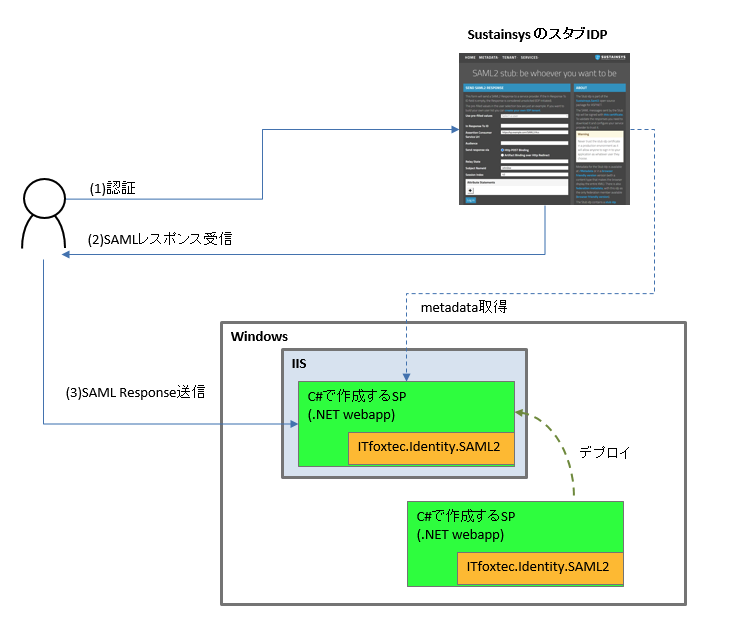
 

使用するライブラリ ITfoxtec.Identity.SAML2  (https://saml2.sustainsys.com/en/v2/#)
動作環境 Windows 11
Idp Sustainsys SAML IDP  (https://stubidp.sustainsys.com/)


参考URL https://qiita.com/urushibata/items/85eb2d0e25b3cd290e14
https://developer.okta.com/blog/2020/10/23/how-to-authenticate-with-saml-in-aspnet-core-and-csharp


■1. Windows に .NET SDKをインストールする。

以下のURLから、。NET SDKと .NET Core Runtime をダウンロードしてインストールする(バージョンを合わせること)
https://dotnet.microsoft.com/ja-jp/download


■2.  webappを作成する

(2.1)以下のコマンドを実行して、Webappを作成する。

dotnet new webapp -o sample
cd sample
dotnet add package ITfoxtec.Identity.Saml2 --version 4.8.2
dotnet add package ITfoxtec.Identity.Saml2.MvcCore --version 4.8.2

(2.2)以下のソースコードを編集•追加する。(それ以外はデフォルトのまま)

(2.2.1) sample/appsettings.json

(IdpMetadataに、SustainsysのStub IDPを指定している)

{
  "Logging": {
    "LogLevel": {
      "Default": "Information",
      "Microsoft.AspNetCore": "Warning"
    }
  },
  "AllowedHosts": "*",
  "Saml2": {
     "IdPMetadata": "https://stubidp.sustainsys.com/Metadata", 
     "Issuer": "http://saml_sample/",
     "SignatureAlgorithm": "http://www.w3.org/2001/04/xmldsig-more#rsa-sha256",
     "CertificateValidationMode": "None", 
     "RevocationMode": "NoCheck"
 }
}

(2.2.2) sample/ClaimsTransform.cs
 using ITfoxtec.Identity.Saml2.Claims;
 using System.Collections.Generic;
 using System.Linq;
 using System.Security.Claims;
 
 namespace sample.Identity
 {
     public static class ClaimsTransform
     {
         public static ClaimsPrincipal Transform(ClaimsPrincipal incomingPrincipal)
         {
             if (!incomingPrincipal.Identity.IsAuthenticated)
             {
                 return incomingPrincipal;
             }
 
             return CreateClaimsPrincipal(incomingPrincipal);
         }
 
         private static ClaimsPrincipal CreateClaimsPrincipal(ClaimsPrincipal incomingPrincipal)
         {
             var claims = new List<Claim>();
 
             // All claims
             claims.AddRange(incomingPrincipal.Claims);
 
             // Or custom claims
             //claims.AddRange(GetSaml2LogoutClaims(incomingPrincipal));
             //claims.Add(new Claim(ClaimTypes.NameIdentifier, GetClaimValue(incomingPrincipal, ClaimTypes.NameIdentifier)));
 
             return new ClaimsPrincipal(new ClaimsIdentity(claims, incomingPrincipal.Identity.AuthenticationType, ClaimTypes.NameIdentifier, ClaimTypes.Role)
             {
                 BootstrapContext = ((ClaimsIdentity)incomingPrincipal.Identity).BootstrapContext
             });
         }
 
         private static IEnumerable<Claim> GetSaml2LogoutClaims(ClaimsPrincipal principal)
         {
             yield return GetClaim(principal, Saml2ClaimTypes.NameId);
             yield return GetClaim(principal, Saml2ClaimTypes.NameIdFormat);
             yield return GetClaim(principal, Saml2ClaimTypes.SessionIndex);
         }
 
         private static Claim GetClaim(ClaimsPrincipal principal, string claimType)
         {
             return ((ClaimsIdentity)principal.Identity).Claims.Where(c => c.Type == claimType).FirstOrDefault();
         }
 
         private static string GetClaimValue(ClaimsPrincipal principal, string claimType)
         {
             var claim = GetClaim(principal, claimType);
             return claim != null ? claim.Value : null;
         }
     }
 }


(2.2.3) sample/Program.cs
using ITfoxtec.Identity.Saml2;
using ITfoxtec.Identity.Saml2.Schemas.Metadata;
using ITfoxtec.Identity.Saml2.MvcCore.Configuration;

var builder = WebApplication.CreateBuilder(args);

// Add services to the container.
builder.Services.AddRazorPages();


builder.Services.Configure<Saml2Configuration>(builder.Configuration.GetSection("Saml2"));
builder.Services.Configure<Saml2Configuration>(saml2Configuration =>
{
    saml2Configuration.AllowedAudienceUris.Add(saml2Configuration.Issuer);
    var entityDescriptor = new EntityDescriptor();
    entityDescriptor.ReadIdPSsoDescriptorFromUrl(new Uri(builder.Configuration["Saml2:IdPMetadata"]));
    if (entityDescriptor.IdPSsoDescriptor != null)
    {
        saml2Configuration.SingleSignOnDestination = entityDescriptor.IdPSsoDescriptor.SingleSignOnServices.First().Location;
        saml2Configuration.SignatureValidationCertificates.AddRange(entityDescriptor.IdPSsoDescriptor.SigningCertificates);
    }
     else
     {
        throw new Exception("IdPSsoDescriptor not loaded from metadata.");
     }
 });
 builder.Services.AddSaml2();


var app = builder.Build();

// Configure the HTTP request pipeline.
if (!app.Environment.IsDevelopment())
{
    app.UseExceptionHandler("/Error");
    // The default HSTS value is 30 days. You may want to change this for production scenarios, see https://aka.ms/aspnetcore-hsts.
    app.UseHsts();
}

app.UseHttpsRedirection();     // HTTPSを強制したくない場合は、この行をコメントアウト
app.UseStaticFiles();

app.UseRouting();
app.MapDefaultControllerRoute();
app.UseSaml2();

app.UseAuthorization();

app.MapRazorPages();

app.Run();


(2.2.4) sample/Controllers/AuthController.cs
using ITfoxtec.Identity.Saml2;
using ITfoxtec.Identity.Saml2.Schemas;
using ITfoxtec.Identity.Saml2.MvcCore;
using System.Collections.Generic;
using System.Threading.Tasks;
using Microsoft.AspNetCore.Authorization;
using Microsoft.AspNetCore.Mvc;
using sample.Identity;
using Microsoft.Extensions.Options;
using System.Security.Authentication;
 
 namespace sample.Controllers
 {
     [AllowAnonymous]
     [Route("Auth")]
     public class AuthController : Controller
     {
         const string relayStateReturnUrl = "ReturnUrl";
         private readonly Saml2Configuration config;
 
         public AuthController(IOptions<Saml2Configuration> configAccessor)
         {
             config = configAccessor.Value;
         }
 
         [Route("Login")]
         public IActionResult Login(string returnUrl = null)
         {
             var binding = new Saml2RedirectBinding();
             binding.SetRelayStateQuery(new Dictionary<string, string> { { relayStateReturnUrl, returnUrl ?? Url.Content("~/") } });
 
             return binding.Bind(new Saml2AuthnRequest(config)).ToActionResult();
         }
 
         [Route("AssertionConsumerService")]
         public async Task<IActionResult> AssertionConsumerService()
         {
             var binding = new Saml2PostBinding();
             var saml2AuthnResponse = new Saml2AuthnResponse(config);
 
             binding.ReadSamlResponse(Request.ToGenericHttpRequest(), saml2AuthnResponse);
             if (saml2AuthnResponse.Status != Saml2StatusCodes.Success)
             {
                 throw new AuthenticationException($"SAML Response status: {saml2AuthnResponse.Status}");
             }
             binding.Unbind(Request.ToGenericHttpRequest(), saml2AuthnResponse);
             await saml2AuthnResponse.CreateSession(HttpContext, claimsTransform: (claimsPrincipal) => ClaimsTransform.Transform(claimsPrincipal));
 
             var relayStateQuery = binding.GetRelayStateQuery();
             var returnUrl = relayStateQuery.ContainsKey(relayStateReturnUrl) ? relayStateQuery[relayStateReturnUrl] : Url.Content("~/");

             return Redirect(returnUrl);
         }
 
         [HttpPost("Logout")]
         [ValidateAntiForgeryToken]
         public async Task<IActionResult> Logout()
         {
             if (!User.Identity.IsAuthenticated)
             {
                 return Redirect(Url.Content("~/"));
             }
 
             var binding = new Saml2PostBinding();
             var saml2LogoutRequest = await new Saml2LogoutRequest(config, User).DeleteSession(HttpContext);
             return Redirect("~/");
         }
     }
 }


(2.2.5) sample/Pages/Claims.cshtml
@page
@model ClaimsModel
@{
    ViewData["Title"] = "Home page";
}

<div class="row">
    <div class="col-md-12">
        <h2>The users Claims (Iteration on User.Claims)</h2>
        <p>
            @foreach (var claim in User.Claims)
            {
                <strong>@claim.Type</strong> <br /> <span style="padding-left: 10px">Value: @claim.Value</span> <br />
            }
        </p>
    </div>
</div>


(2.2.6) sample/Pages/Claims.cshtml.cs
using System;
using System.Collections.Generic;
using System.Linq;
using System.Threading.Tasks;
using Microsoft.AspNetCore.Mvc;
using Microsoft.AspNetCore.Mvc.RazorPages;
using Microsoft.AspNetCore.Authorization;
using Microsoft.Extensions.Logging;
namespace sample.Pages
{
    [Authorize]
    public class ClaimsModel : PageModel
    {
        private readonly ILogger<ClaimsModel> _logger;
        public ClaimsModel(ILogger<ClaimsModel> logger)
        {
            _logger = logger;
        }
        public void OnGet()
        {
        }
    }
}


(2.2.7) sample/Pages/Shared/_Layout.cshtml
<!DOCTYPE html>
<html lang="en">
<head>
    <meta charset="utf-8" />
    <meta name="viewport" content="width=device-width, initial-scale=1.0" />
    <title>@ViewData["Title"] - saml_example</title>
    <link rel="stylesheet" href="~/lib/bootstrap/dist/css/bootstrap.min.css" />
    <link rel="stylesheet" href="~/css/site.css" asp-append-version="true" />
</head>
<body>
    <header>
        <nav class="navbar navbar-expand-sm navbar-toggleable-sm navbar-light bg-white border-bottom box-shadow mb-3">
            <div class="container">
                <a class="navbar-brand" asp-area="" asp-page="/Index">sample</a>
                <button class="navbar-toggler" type="button" data-bs-toggle="collapse" data-bs-target=".navbar-collapse" aria-controls="navbarSupportedContent"
                        aria-expanded="false" aria-label="Toggle navigation">
                    <span class="navbar-toggler-icon"></span>
                </button>
                <div class="navbar-collapse collapse d-sm-inline-flex justify-content-between">
                    <ul class="navbar-nav flex-grow-1">
@if (((System.Security.Claims.ClaimsIdentity)User.Identity).IsAuthenticated)
{
    <li class="nav-item">
        <a class="nav-link text-dark" asp-area="" asp-page="/Claims">SAML Claims</a>
    </li>
    <li>
        @if (User.Identity.Name != null)
        {
            <span class="navbar-text">Hello, @User.Identity.Name!</span>
        }
        else
        {
            <span class="navbar-text">Hello</span>
        }
    </li>
    <li>
        <form class="form-inline" asp-controller="Auth" asp-action="Logout">
            <button type="submit" class="nav-link btn btn-link text-dark">Logout</button>
        </form>
    </li>
}
else
{
    <li class="nav-item">
        <a class="nav-link text-dark" asp-controller="Auth" asp-action="Login">Login</a>
    </li>
}
                    </ul>
                </div>
            </div>
        </nav>
    </header>
    <div class="container">
        <main role="main" class="pb-3">
            @RenderBody()
        </main>
    </div>

    <footer class="border-top footer text-muted">
        <div class="container">
            © 2025 - saml_example - <a asp-area="" asp-page="/Privacy">Privacy</a>
        </div>
    </footer>

    <script src="~/lib/jquery/dist/jquery.min.js"></script>
    <script src="~/lib/bootstrap/dist/js/bootstrap.bundle.min.js"></script>
    <script src="~/js/site.js" asp-append-version="true"></script>

    @await RenderSectionAsync("Scripts", required: false)
</body>
</html>


■3. ビルドとデプロイ用のリリース物件を作成

(3.1)以下のコマンドを実行し、ビルドとIISにデプロイする物件を作成する。

dotnet  build
dotnet publish --configuration Release

上記を実行すると、sample¥bin¥Release¥netX.0¥publish 配下にデプロイファイル群一式ができる。


■4. IISにアプリケーションとして追加

(4.1)IISマネージャ起動
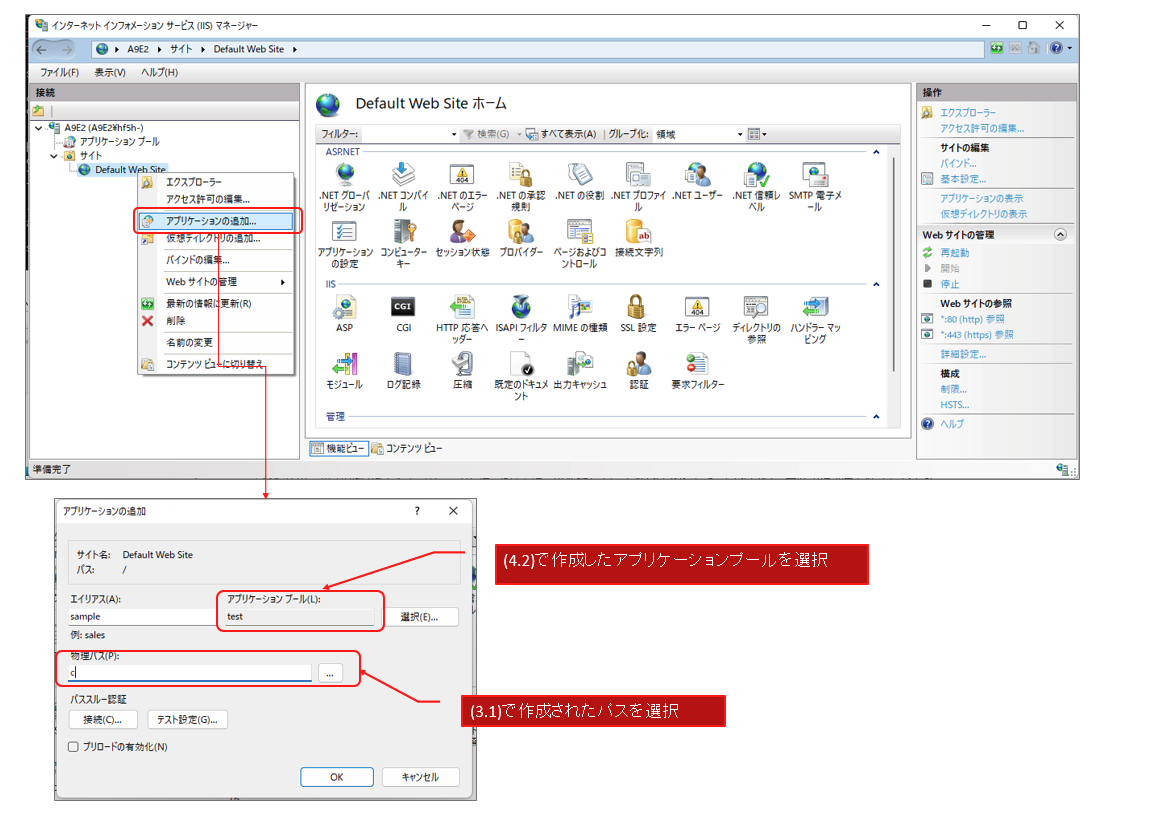
(4.2)アプリケーションプールを新規作成(デフォルト設定でOK)
(4.3)Default Web Siteを右クリックして、「アプリケーションの追加」を選択
(4.4)上記■3. で作成したアプリケーションフォルダを選択
 

■5. 動かし方

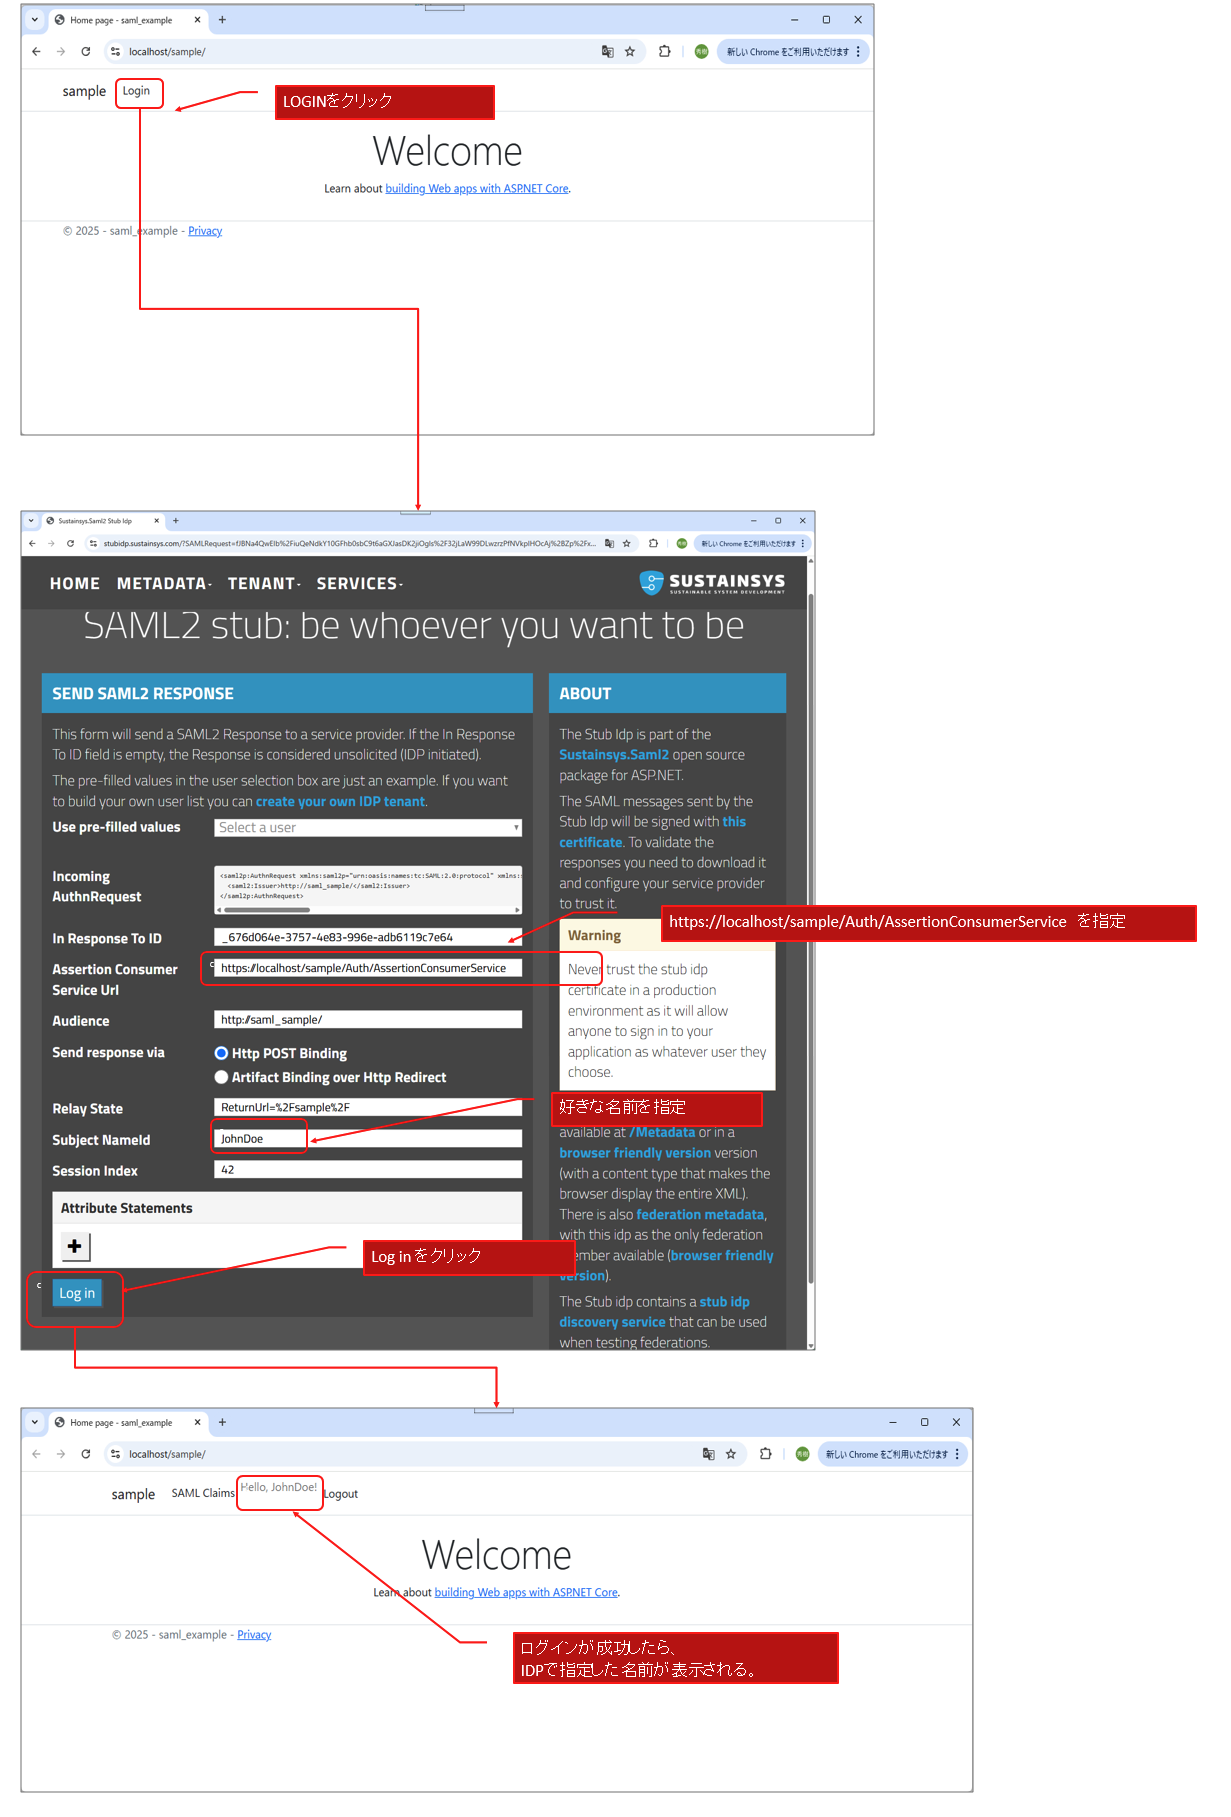
エイリアスを、”sapmple”とした場合、WEBブラウザで以下のようにアクセス。
(5.1)https://localhost/sample/
(5.2)下図のようにIDPで認証する。


■6. その他

(6.1) メタデータ取得に失敗する場合

もしこのSPを会社のイントラネット配下で動かした場合に、下図ように、Proxyサーバを経由したmetadataの取得に失敗するかもしれない。
その場合の回避策の1つとして、以下からメタデータをダウンロードし、
https://stubidp.sustainsys.com/Metadata
それを、今回作成したアプリケーションの、wwwroot配下に、metadata.xmlとして保存し、appilcation.jsonを以下のように変更することで回避することが可能。

{
  "Logging": {
    "LogLevel": {
      "Default": "Information",
      "Microsoft.AspNetCore": "Warning"
    }
  },
  "AllowedHosts": "*",
  "Saml2": {
     "IdPMetadata":"https://localhost/sample/metadata.xml",  // "https://stubidp.sustainsys.com/Metadata", 
     "Issuer": "http://saml_sample/",
     "SignatureAlgorithm": "http://www.w3.org/2001/04/xmldsig-more#rsa-sha256",
     "CertificateValidationMode": "None", 
     "RevocationMode": "NoCheck"
 }
}


(6.2) 署名のチェック

今回の例では、署名のチェックをしていない。署名のチェックをする場合は、以下のようにCertificateValidationMode を変更する。ただし、その場合はIDPの公開鍵を信頼済みルートCAとして登録する必要がある。(studbidpの公開鍵を信頼済みルートCAに登録する場合は、開発環境にとどめるなど注意が必要。本番環境でやってしまうと、不特定多数の人間が任意のユーザになりすますことができてしまう)

{
  "Logging": {
    "LogLevel": {
      "Default": "Information",
      "Microsoft.AspNetCore": "Warning"
    }
  },
  "AllowedHosts": "*",
  "Saml2": {
     "IdPMetadata":"https://localhost/sample/metadata.xml",  // "https://stubidp.sustainsys.com/Metadata", 
     "Issuer": "http://saml_sample/",
     "SignatureAlgorithm": "http://www.w3.org/2001/04/xmldsig-more#rsa-sha256",
     "CertificateValidationMode": "ChainTrust", 
     "RevocationMode": "NoCheck"
 }
}
16 3月, 2025

Chrome拡張

[English]

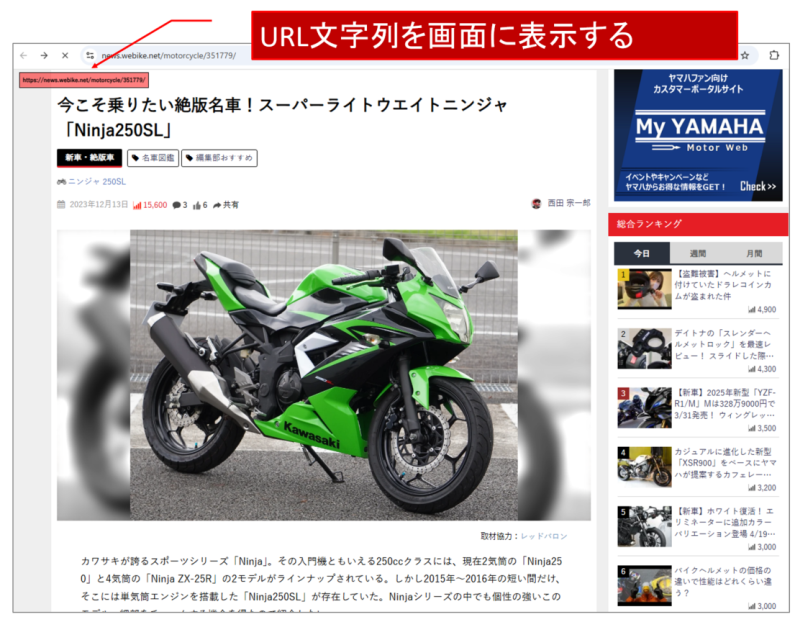
URL文字列を表示するシンプルなChrome拡張のサンプル。
IT開発者がクラウドサービスを利用する際、「開発環境」「本番環境」などを視覚的にはっきり表示したい場合などに使えるかもしれません。(本番環境は「赤字」で表示するなど)


1.ファイル構成

   background.js
   contentscript.js
   contentscript.css
   manifest.json
   icons/mysample.png


2. ファイルの内容

2.1. background.js

chrome.tabs.onUpdated.addListener(function  (tabId, changeInfo, tab){
    if(changeInfo.url){
        const message = {"type": "change_url"};
        chrome.tabs.sendMessage(tabId, message);
    }
  }
);


2.2. contentscript.js

var PANEL_ID          = 'mysample_panel';
var PANEL_CLASS_LEFT  = 'mysample_panel_top_right';
var PANEL_CLASS_RIGHT = 'mysample_panel_top_left';

(function(){
    chrome.runtime.onMessage.addListener(
     async function(message, sender, callback){
       if(message.type === "change_url"){
           change_url(location.href);
       }
     }
  );
})();

window.onload = showMySamplePanel();

//----------------------------------------------------------
// [Japanese] URL文字列を表示する MY_PANEL  をDOMに追加する。
// [English]  Add "MY_PANEL" to the DOM, which shows the url string.
//----------------------------------------------------------

async function showMySamplePanel() {
    var panel = document.createElement('div');
    panel.setAttribute('id', PANEL_ID);
    panel.setAttribute('class', PANEL_CLASS_LEFT);
    panel.onmouseover = moveMySamplePanel;

    
    var message = document.createElement('p');
    message.innerText = '';
    panel.appendChild(message);
    document.body.appendChild(panel);
    change_url(location.href);
}

//----------------------------------------------------------
// [Japanese] MY_PANELの位置を変える
// [English]  Change MY_PANEL's position
//----------------------------------------------------------
async function moveMySamplePanel() {
    var panel = document.getElementById(PANEL_ID);
    var elementClass = panel.getAttribute('class');
    if (elementClass == PANEL_CLASS_RIGHT) {
        panel.setAttribute('class', PANEL_CLASS_LEFT);
    } else {
        panel.setAttribute('class', PANEL_CLASS_RIGHT);
    }
}

//----------------------------------------------------------
// [Japanese] URL文字列をセットする
// [English]  set the url string.
//----------------------------------------------------------
function change_url(url)
{
    // Change Message when the URL changed.
    var panel = document.getElementById(PANEL_ID);
    panel = document.getElementById(PANEL_ID);
    panel.textContent = url;
    panel.style.backgroundColor="rgba(255,0,0,0.5)";
}

2.3. contentscript.css

#mysample_panel {
  padding: 5px;
  border: solid 1px #000000;
  position: fixed;
  top: 5px;
  z-index: 99999;
  color: black;
  float: left;
  font-weight: bold;
  font-size: x-small;
}

.mysample_panel_top_right {
  position: fixed;
  top: 1px;
  right: 15px;
}

.mysample_panel_top_left {
  position: fixed;
  top: 1px;
  left: 15px;
}


2.4. manifest.json

{
    "manifest_version": 3,
    "name": "my sample",
    "version": "1.0",
    "description": "show url string",
    "icons": { 
        "16":  "icons/mysample.png", 
        "48":  "icons/mysample.png", 
        "128": "icons/mysample.png"
    },

    "content_scripts": [
        {
            "matches": ["https://*/*", "http://*/*"],
            "js": ["contentscript.js"],
            "css": ["contentscript.css"],
            "run_at": "document_end"
        }
    ],
    "permissions" :[
        "storage", "scripting", "tabs", "activeTab" 
    ],
    "background" : {
      "service_worker" : "background.js"
    }
}

またicons/mysample.pngとして以下のような画像ファイルも用意します。

16 3月, 2025

Bluetooth イヤホンが特定のデバイスとだけ繋がらない

[English]

私はスマホは Google Pixel 6aを使っており、Bluetoothイヤホンに JVC HA-FX18Wを使っているが、
ある日突然、うまく繋がらなくなった。症状は以下の通り。

  • Bluetoothデバイスとしてスマホと接続はする
  • 接続しても、イヤホンから音が出ない
  • 接続しても、数十秒したら切断される
  • 他のデバイス(Mac Book Air)とは接続し、音も出るのでイヤホン自体が壊れているとは思えない

という状態になってしまった。スマホからデバイスを削除してやり直しても症状は改善しなかったが、
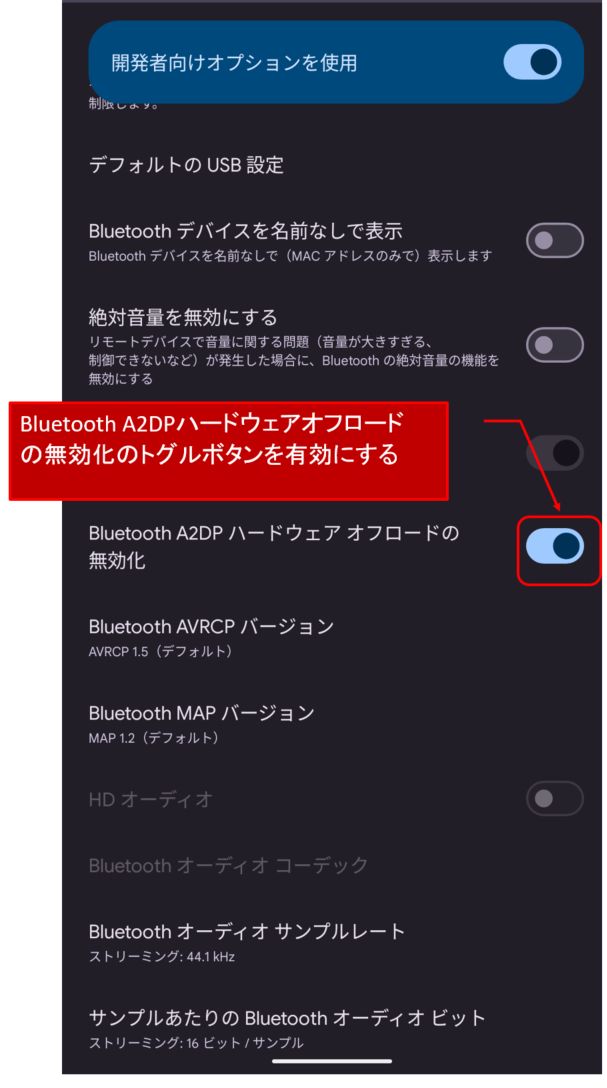
開発者オプションで、「Bluetoooth A2DPハードウェア オフロードの無効化」を有効にしたらうまく動くようにになった。
同様の現象に苦しんでおられる方は一度お試しください。

30 4月, 2024

KAWASAKI ninja250SL ドライブスプロケットと音

[English]

異音に悩まされる

2023年12月にNinja 250SLを中古で購入したが、特に5速、6速で低回転の場合に異音(金属同士が擦れるような音)がするのが非常に不快。購入した店(某赤男爵)では特に何も問題ないとのこと。しかしどうしても納得できなかったためネットで調べたところ、社外品のスプロケットは消音ダンパー(ゴム)がついていない場合が多いので、交換するとうるさくなるという情報を見つける。

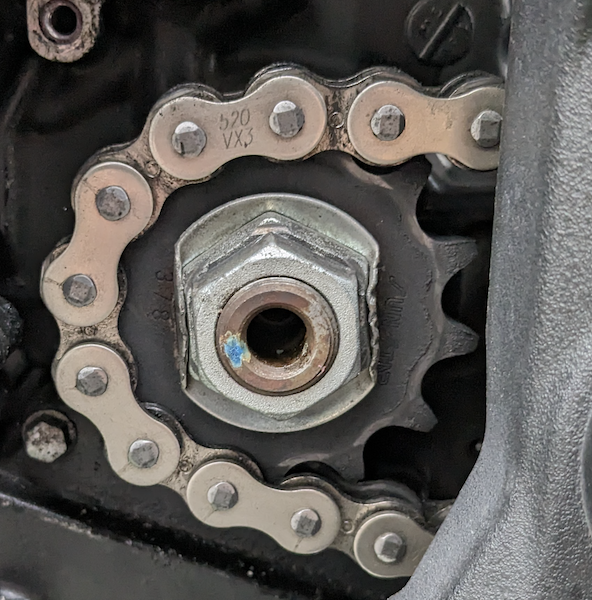
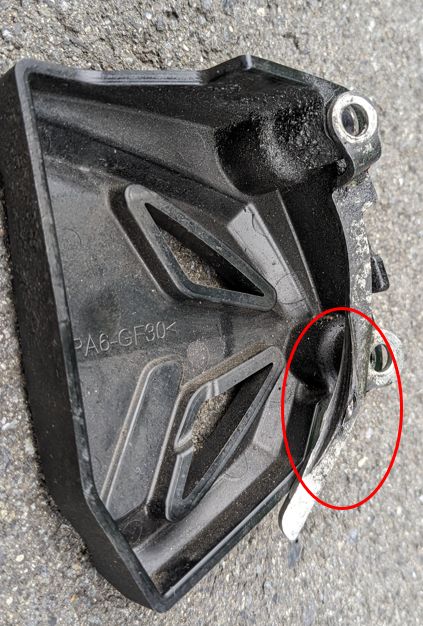
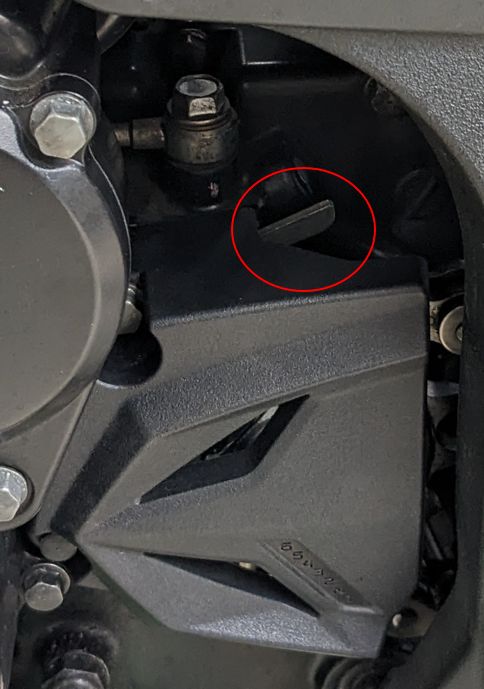
スプロケットカバーを開けたところ、SUNSTARの378が設定されていた。さらにチェーンガイドプレートが異常に削られていた。(これは後から分かったことだが、チェーンガイドプレートが上下逆にセットされていたため、削れてしまっていたようだ。前オーナーが自分で交換した時に間違えたのか?)

このチェーンガイドプレートが削られるような状態が異音の原因かと思い、チェーンガイドプレートを外した(スプロケットカバーも外した)状態で少し走って音を確認したが、変化がなかったので、すでに十分削れてしまって干渉はしていなかった模様。

SUNSTAR 378
削られたガイドプレート。なおこれは取り付けの向きが上下逆になっている。
チェーンガイドプレートを正しくセットした場合、カバーの上から少し飛び出して見える。


ドライブスプロケットを交換

そこで、NAPSで純正のスプロケット13144-0577を注文し、取り付けてもらったところ異音が解消されたので、交換前後の音を載せる。
(なお、チェーンガイドプレートが上下逆にセットされていたせいで、異常な形に削れてしまい正しい向きにセットできなかったので、チェーンガイドプレートを削ってもらってセットした。)

変更前:途中、金属が削られるような音が聞こえる。 特に10秒目くらいから
(5速にシフトアップし、回転数低めの状態)

変更後:金属が削られるような音は聞こえない。

24 4月, 2023

apache + perl + cgi + mysql(DBD::mysql, DBI)環境をMacBook Air(M1)のDockerに構築

[English]

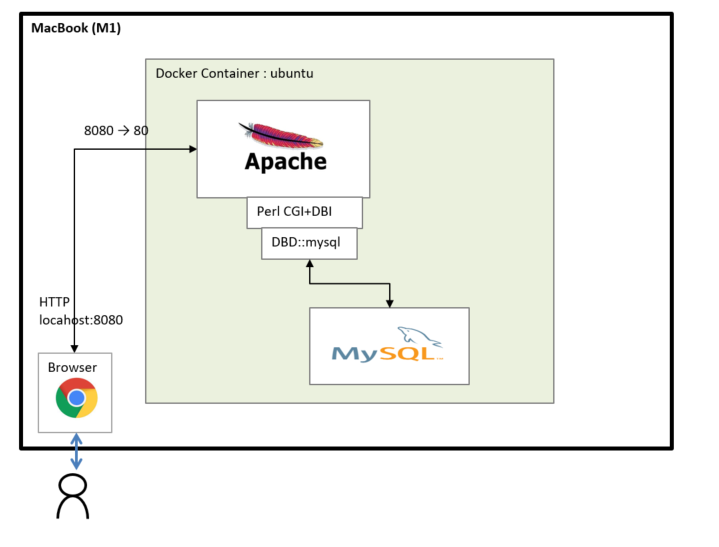
下図のようにMacBook Air(M1) 上の Docker に Ubuntuを入れて、そこに apache + perl + cgi + mysql(DBD::mysql, DBI)環境を作成する。


■1. Docker コンテナ作成

(1.1)Dockerイメージの取得

docker image pull amd64/ubuntu:focal

(1.2)Dockerコンテナ作成

docker run -p 8080:80 -p 3307:3306 -it -d --name ubuntu amd64/ubuntu:focal


■2. 作成したDockerコンテナの環境構築

(2.1)作ったDockerコンテナにログイン

docker exec -it ubuntu /bin/bash

(2.2)以下を実行し環境を構築

apt update
apt install -y apache2
    timezone を聞かれるので適当に応える。
apt install -y wget
apt install -y gcc
apt install -y make
apt install -y mysql-server
apt install -y libmysqlclient-dev
apt install libssl-dev
wget https://www.cpan.org/modules/by-module/DBI/DBI-1.643.tar.gz
tar xvzf DBI-1.643.tar.gz
cd DBI-1.643
perl Makefile.PL
make
make install
cpan update
cpan install DBD::mysql
a2enmod cgid


(2023/4/25追記)
DBIのインストールは、以下ではなく、

wget https://www.cpan.org/modules/by-module/DBI/DBI-1.643.tar.gz
tar xvzf DBI-1.643.tar.gz
cd DBI-1.643
perl Makefile.PL
make
make install


以下の方法でもOKです。

cpan install DBI


■3. MySQLのDB作成とサンプルデータ投入

(3.1)DBとユーザ作成

mysqld_safe --user=mysql &
mysql -u root
mysql>create database mydb;
mysql>create user 'test'@localhost identified by 'test';
mysql>grant all privileges on mydb.* to 'test'@localhost;
mysql>alter user 'test'@localhost IDENTIFIED WITH mysql_native_password by 'test';
mysql>quit

(3.2)DBに接続しデータをINSERTする。

mysql -u test -p
mysql>test
mysql>use mydb;
mysql>create table m_id(id varchar(30), name varchar(30));
mysql>insert into m_id values('001','admin'); 
mysql>insert into m_id values('002','Smith'); 
mysql>insert into m_id values('003','Johnson'); 
mysql>insert into m_id values('004','Williams'); 
mysql>commit;
mysql>quit


■4. サンプルCGIの設置

(4.1)以下のパスに以下のテスト用Perlプログラム配置

パス:/usr/lib/cgi-bin/test.cgi
ソース:

#!/usr/bin/perl
use strict;
use DBI;

my $DB_HOST="127.0.0.1";
my $DB_PORT="3306";
my $DB_NAME="mydb";
my $DB_USER="test";
my $DB_PASS="test";

sub get_db_conn()
{
  my $dbh=undef;
  eval {
    $dbh = DBI->connect("dbi:mysql:dbname=$DB_NAME;host=$DB_HOST;port=$DB_PORT","$DB_USER","$DB_PASS");
  };
  if($@){
    print STDERR "DB ERROR $@n";
    $dbh = undef;
  }
  return $dbh;
}

my $dbh = get_db_conn();
my $sql = "select id, name from m_id";
my $sth = $dbh->prepare($sql);
$sth->execute();
print "Content-type: text/html;\n\n";
print "<html>";
print "<body>";
print "<table border=1>";
while(my $ary_ref = $sth->fetchrow_arrayref){
  my($id, $name) = @$ary_ref;
  print "<tr><td>$id</td><td>$name</td></tr>";
}
print "</table>";
print "</body>";
print "</html>";


(4.2)実行権限をつける

chmod ugo+x /usr/lib/cgi-bin/test.cgi


■5. 動作確認

(5.1)apache起動

apachectl start

(5.2)MacのWebブラウザ上で以下にアクセス
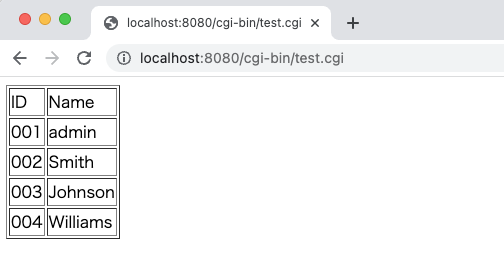
http://localhost:8080/cgi-bin/test.cgi

19 4月, 2023

セイコー4R35の姿勢差

[English]

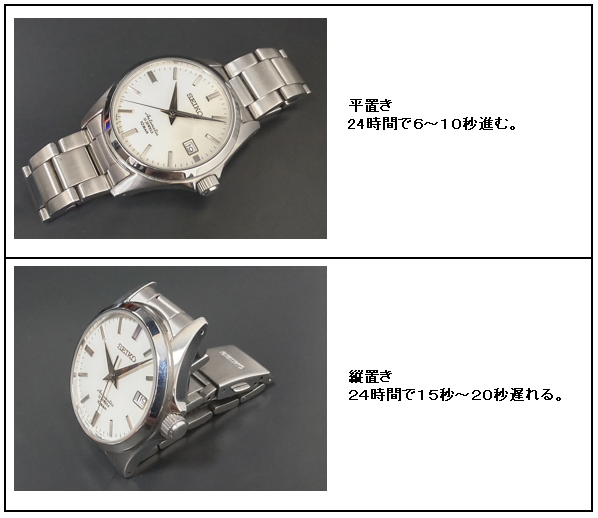
セイコー SZSB011 のムーブメント 4R35の姿勢差を10日間ほどチェックした結果。

ほぼ12時間間隔で、縦置きと平置きにしながら、どれだけ時計が進んだか遅れたかを確認した結果。
平置きで、24時間で6〜10秒進み、縦置きにすると15秒〜20秒遅れることが確認できた。
正確とは言えないが、時計の進み具合と置き方で調整できるので、うまくやれば結果的にリューズを操作しての時刻合わせが不要になる。

  状態     進み/遅れ     24時間あたりの
進み/遅れ
  縦置き       -8      -16.02
  縦置き      -8     -16.53
  平置き      +5       +9.69
  平置き      +4       +8.36
  平置き      +3       +6.00
  平置き      +3       +6.03
  平置き      +4       +7.67
  縦置き      -9      -17.83
  平置き      +3      +6.13
  平置き      +4      +8.23
  平置き      +4      +8.06
  縦置き      -8     -15.74
  平置き      +5      +8.99
  平置き      +3      +6.98
  平置き      +5      +9.22
  縦置き      -8     -17.12
  縦置き      -8     -16.02
  平置き      +3      +6.03
  平置き      +5      +9.59
  平置き      +5      +10.13
  縦置き     -10     -20.37
  縦置き      -8     -15.76


18 4月, 2023

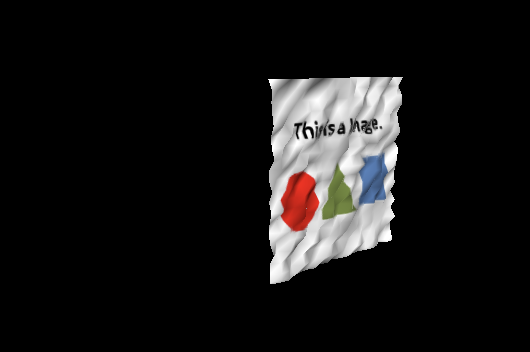
THREE.js (WebGL)で少し複雑なポリゴンにテクスチャを貼り付ける

[English]

THREE.js (WebGL)でメッシュにテクスチャを貼り付けるサンプル。

[demo]

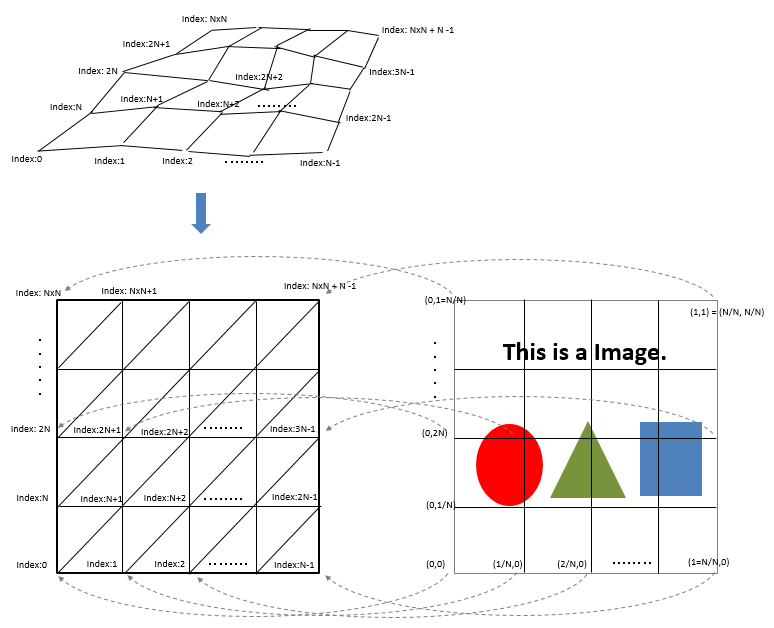
(1)頂点はN x N個
(2)N x N 個の頂点を使って、三角形(Polygon)を作る
(3)頂点のZ軸の値をランダムにすることで、表面をでこぼこにする。
(4)三角形にテクスチャを貼り付ける。


ソースコード(html+javascript。three.jsが別途必要)
https://github.com/hidemiubiz/public/blob/main/Web/WebGL/sample02.html


<!DOCTYPE html>
<html>
<head>
<meta charset="UTF-8" />
<script src="three.js"></script>
<script type="text/javascript">
  window.addEventListener('DOMContentLoaded', init);

  const scene = new THREE.Scene();
  var rectangle;
  var renderer;
  var camera;

  function init() {
    const width = 600;
    const height = 400;

    renderer = new THREE.WebGLRenderer({
      canvas: document.querySelector('#myCanvas')
    });
    renderer.setSize(width, height);
    renderer.setPixelRatio(window.devicePixelRatio);

    camera = new THREE.PerspectiveCamera(45, width / height, 1, 1000);
    camera.position.set(1.5, 1.0, 1.5);
    camera.lookAt(new THREE.Vector3(0, 0.5, 0));

    rectangle = createRectangleWithTexture(20, 1);
    scene.add(rectangle);

    const light = new THREE.DirectionalLight(0xFFFFFF, 1.0);
    light.position.set(1, 1, 1);
    scene.add(light);

    const ambientLight = new THREE.AmbientLight(0x222222);
    scene.add(ambientLight);

    requestAnimationFrame(render_scene);
  }

  function render_scene()
  {
    // 物体回転させる(Rotate object)
    rectangle.rotation.y += 0.01;

    renderer.render(scene, camera);
    requestAnimationFrame(render_scene);
  }

  function createRectangleWithTexture(NUM_MESH, length){
    // ポリゴンの頂点座標の配列(Polygon's positon array)
    var pos = new Float32Array(NUM_MESH*NUM_MESH*3);
    var n=0;
    for(var y=0; y<NUM_MESH; y++){ 
      for(var x=0; x<NUM_MESH; x++){
        pos[n] = x * length/NUM_MESH; n++;
        pos[n] = y * length/NUM_MESH; n++;
        pos[n] = Math.random()*(length/NUM_MESH); n++; // ランダム値をセット(Set random value)
      }
    }

    // ポリゴンの三角形をインデックスで指定(Polugon's index array)
    n=0;
    var index = new Uint32Array(3*((NUM_MESH-1)*(NUM_MESH-1)*2));
    for(var y=0; y<NUM_MESH-1; y++){ 
      for(var x=0; x<NUM_MESH-1; x++){
        index[n] = y*NUM_MESH + x; n++;
        index[n] = y*NUM_MESH + x + 1; n++;
        index[n] = (y+1)*NUM_MESH + x + 1; n++;

        index[n] = y*NUM_MESH + x; n++;
        index[n] = (y+1)*NUM_MESH + x + 1; n++;
        index[n] = (y+1)*NUM_MESH + x; n++;
      }
    }

    // ポリゴンのTexgure位置座標の配列 (Texture uv positions array)
    n=0;
    var uvs = new Float32Array(NUM_MESH*NUM_MESH*2);
    for(var y=0; y<NUM_MESH; y++){ 
      for(var x=0; x<NUM_MESH; x++){
        uvs[n] = x/(NUM_MESH-1); n++;
        uvs[n] = y/(NUM_MESH-1); n++;
      }
    }

    // 2つの三角形をインデックスで指定(Polygon's index array)
    const geom = new THREE.BufferGeometry();
    geom.setAttribute("position", new THREE.BufferAttribute(pos, 3));
    geom.setIndex(new THREE.BufferAttribute(index,1)); 
    geom.computeVertexNormals();
    geom.setAttribute("uv", new THREE.BufferAttribute(uvs, 2));

    const texture = new THREE.TextureLoader().load("webgl_texture01.png");

    const triMat = new THREE.MeshStandardMaterial({color:0xffffff, map: texture, side:THREE.DoubleSide});
    const triMesh = new THREE.Mesh(geom, triMat);
    return triMesh;
  }

</script>
</head>
<body>
<canvas id="myCanvas"></canvas>
</body>
</html>
17 4月, 2023

THREE.js (WebGL)でシンプルなポリゴンにテクスチャを貼り付ける

[English]

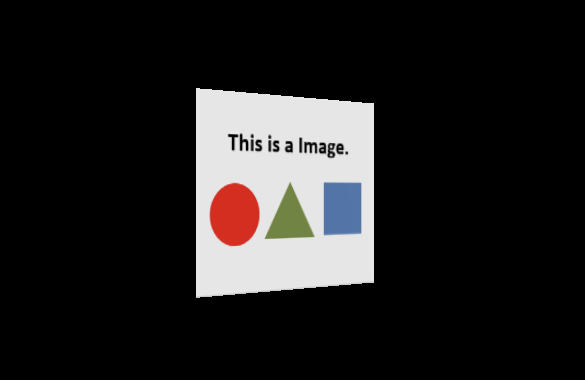
THREE.js (WebGL)でシンプルなポリゴンにテクスチャを貼り付けるサンプル。

[demo]

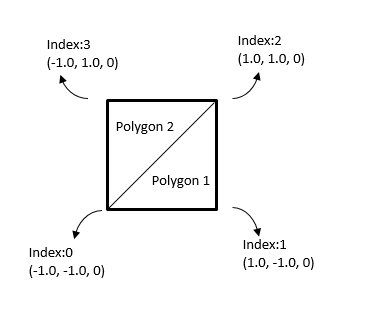
作成するポリゴン
(1)頂点は4個
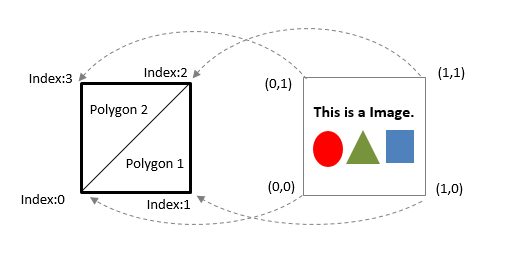
(2)4個の頂点を使って、2つの三角形(Polygon1, Polygon2)を作る(4個の頂点をIndex指定する)


(3)2つの三角形にテクスチャを貼り付ける


ソースコード(html+javascript。three.jsが別途必要)
https://github.com/hidemiubiz/public/blob/main/Web/WebGL/sample01.html

<!DOCTYPE html>
<html>
<head>
<meta charset="UTF-8" />
<script src="three.js"></script>
<script type="text/javascript">
    window.addEventListener('DOMContentLoaded', init);

    const scene = new THREE.Scene();
    var rectanble;
    var renderer;
    var camera;

    function init() {
       const width = 600;
       const height = 400;

       renderer = new THREE.WebGLRenderer({
          canvas: document.querySelector('#myCanvas')
       });
       renderer.setSize(width, height);
       renderer.setPixelRatio(window.devicePixelRatio);

       camera = new THREE.PerspectiveCamera(45, width / height, 1, 1000);
       camera.position.set(0, 0, 5);

       rectangle = createRectangleWithTexture();
       scene.add(rectangle);

       const light = new THREE.DirectionalLight(0xFFFFFF, 1.0);
       light.position.set(1, 1, 1);
       scene.add(light);

       const ambientLight = new THREE.AmbientLight(0x222222);
       scene.add(ambientLight);

       requestAnimationFrame(render_scene);
    }

    function render_scene()
    {
       // 物体回転させる(Rotate object)
       rectangle.rotation.y += 0.01;

       renderer.render(scene, camera);
       requestAnimationFrame(render_scene);
    }

    function createRectangleWithTexture(){
       // ポリゴンの頂点座標の配列(Polygon's positon array)
       const pos = new Float32Array([
          -1.0, -1.0, 0.0,
          1.0, -1.0, 0.0,
          1.0, 1.0, 0.0,
          -1.0, 1.0, 0.0
       ]);
       // 2つの三角形をインデックスで指定(Polygon's index array)
       const index = new Uint32Array([
          0,1,2, 0,2,3
       ]);

       // ポリゴンのTexgure位置座標の配列 (Texture uv positions array)
       var uvs = new Float32Array([
          0,0, 1,0, 1,1, 0,1
       ]);

       const geom = new THREE.BufferGeometry();
       geom.setAttribute("position", new THREE.BufferAttribute(pos, 3)); // ポリゴンの頂点を指定 (Set Polygon's posistion) 
       geom.setIndex(new THREE.BufferAttribute(index,1)); //ポリゴンの頂点の順番を指定(Set ordder of Polygon's position) 
       geom.computeVertexNormals(); // ポリゴンの法線を計算 (calculate polygon's normal)
       geom.setAttribute("uv", new THREE.BufferAttribute(uvs, 2)); // テクスチャの位置を指定(Set texture's UV position)

       const texture = new THREE.TextureLoader().load("webgl_texture01.png");

       const triMat = new THREE.MeshStandardMaterial({color:0xffffff, map: texture, side:THREE.DoubleSide});
       const triMesh = new THREE.Mesh(geom, triMat);
       return triMesh;
    }

</script>
</head>
<body>
<canvas id="myCanvas"></canvas>
</body>
</html>


15 4月, 2023

Docker Desktopが表示されなくなった場合

[English]

発生した環境:M1 MacBook Air  Ventura 13.2.1

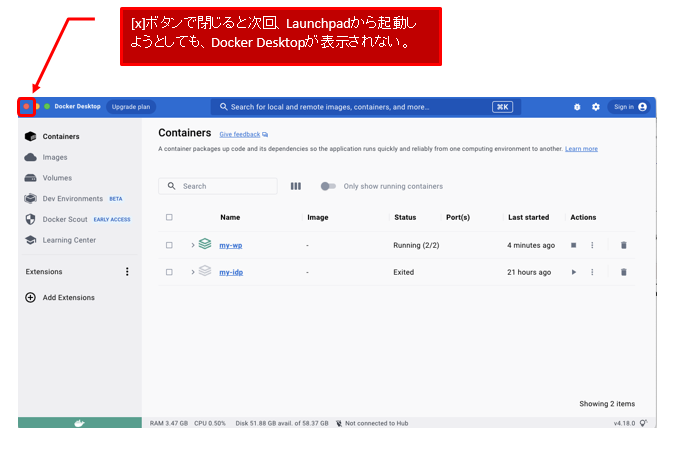
Docker Destkop を、[x]ボタンで閉じた場合、次にLaunchpadから起動しようとしても表示されない。

どうも、プロセス自体がまだ残っているのが原因のようで、以下のようにプロセスをkillしてやるとLaunchpadから起動できた。

(1)以下のコマンドでDocker Desktop を探す

>ps -aef | grep -i docker | grep -i desktop | grep name
  501 19845 19811   0 10:13AM ??         0:06.63 /Applications/Docker.app/Contents/MacOS/Docker Desktop.app/Contents/MacOS/Docker Desktop --name=dashboard

(2)上記で見つけたプロセスIDを kill する。

注意!! Docker関連のプロセスが全てkillされるので、その後 launchpadからDocker Desktopを立ち上げたり。個別のDocker Containerをたちがる必要がある。

13 4月, 2023

自前のSAML IdPを作成する

[English]

何らかのWebシステムを構築し、ログインをSAMLで実現したい場合、開発環境をどうするか。

開発環境は、任意のユーザとしてログインできる必要がある。しかし、開発環境特有の特殊なログインだと本番環境で起きる問題を事前に洗い出せない場合があるので、本物のIDPと同じ動きが可能な、開発環境に使用できるSAML IdPを使用したいと思うかもない。そこで、自分専用のSAML IdPを立ち上げる手順を紹介する。


■1. 環境作成の概要

サンプルとして以下のような環境を作成する。

(1)WordPress環境を作成し、それと連携する独自 IdP を立ち上げる。
(2)WordPressのSAMLプラグインは miniOrange SAML 2.0 SSO Pluginを使用する。
(3)独自IdPは SimpleSAMLphp を使用する。
(4)上記環境は、Dockerを使って作成する。
(miniOralge SAML 2.0 SSO Plugin の無料版は、
 WordPress上に存在しないユーザが SAML認証をパスしたら、自動的にそのユーザアカウントが生成される)


■2. 環境構築

必要なプログラムやシェルを以下に用意したのでそれを使用して説明する(内容の詳細は後述する)

(1)以下から、my-env.tgzをダウンロードする。
https://github.com/hidemiubiz/public/blob/main/SAML/my-env.tgz
(2)適当なフォルダ配下で解凍する。
(3)独自IdP(my-idp)の構築
(3.1)Docker Composeを使用して独自SAML IdP環境を作成

cd my-env/my-idp
docker-compose up -d

(3.2)SAML連携で使用する公開鍵、秘密鍵を作成する

docker exec -it my-idp-php-1 /bin/bash
cd /var/www/html
/bin/sh prepare-env.sh

–> ここで作成された、my.crt (公開鍵)の内容をメモしておく。
(/var/www/html配下に、公開鍵、秘密鍵が置かれてしまう!! デモなので考慮しないが本来は別の場所に配置すべき)

(4)WordPress 環境の構築
(4.1)Docker Compose を使用してして作成する

cd my-env/my-wp
docker-compose up -d

(4.2)WordPressのインストール
http://localhost:8000/wp-admin にアクセスし、指示に従ってWordPressをインストールする。
(言語を選んで、次にアカウントを1個作るだけ)

(4.3)SAML Pluginのインストール
(4.3.1)http://localhost:8000/wp-admin にアクセスし、上記(4.2)で作ったアカウントでログイン
(4.3.2)プラグイン -> 新規追加で新規追加ボタンを押す
(4.3.3)SAML で検索し、SAML Single Sign On -SSO Loginをインストールし有効化(4.4)SAML Pluginの設定
(4.4.1)minOrange SAML 2.0 SSOをクリック
(4.4.2)Servie Provider Setupタブで以下を設定

Identity Provider Name: test
Idp Entity ID or Issuer: http://localhost:8080/
SAML Login URL: http://localhost:8080/mylogin.php
X.509 Certificate: 上記(3.2)でメモした公開鍵

(4.4.3)Test Configurationで動作確認


■3. my-env.tgzについて

下図のファイル構成になっている。

my-env/
  |--my-idp/
  |   |--docker-compose.yml
  |   |--php/
  |   |   |--php.ini
  |   |   |--Dockerfile
  |   |
  |   |--nginx/
  |   |   |--nginx.conf
  |   |
  |   |--www/
  |       |--html/
  |           |--mysaml.php
  |           |--mylogin.php
  |           |--makecert.sh
  |
  |--my-wp/
      |--docker-compose.yml


・my-env/my-idp/docker-compose.yml

自前のIdP環境を構築するdocker-comopse設定。webサーバとしてnginx、php環境を立てる。

version: '3'
services:
  nginx:
    image: nginx:latest
    ports:
      - 8080:80
    volumes:
      - ./nginx/nginx.conf:/etc/nginx/conf.d/default.conf
      - ./www/html:/var/www/html
    depends_on:
      - php

  php:
    build: ./php
    volumes:
      - ./www/html:/var/www/html


・my-env/my-idp/php/php.ini
date.timezone = "Asia/Tokyo"


・my-env/my-idp/www/html/makecet.sh

自前のIdPが使用する公開鍵と秘密鍵を生成するシェルスクリプト。

!/bin/sh
CN=my
PASSWORD=abcdefgxyz

SJ="/C=JP/ST=Tokyo/L=Minato-ku/O=hidemiu/OU=hidemiu/CN=$CN"
openssl genrsa -des3 -passout pass:${PASSWORD} -out ${CN}.key 2048
openssl rsa -passin pass:${PASSWORD} -in ${CN}.key -out ${CN}.key
openssl req -new -sha256 -key ${CN}.key -out ${CN}.csr -subj "$SJ"
openssl req -x509 -in ${CN}.csr -key ${CN}.key -out ${CN}.crt -days 3650


・my-env/my-idp/www/html/mylogin.php

https://github.com/hidemiubiz/public/blob/main/SAML/my-env/my-idp/www/html/mylogin.php

SP(WordPress)からSAMLRequestを受け取り、それをformに保持し、ログインするユーザアカウントを指定する画面のphp。


・my-env/my-idp/www/html/mysaml.php

https://github.com/hidemiubiz/public/blob/main/SAML/my-env/my-idp/www/html/mysaml.php

SAMLRequestとログインするユーザアカウントを受け取りSAMLレスポンスを生成し、SP(WordPress)に送信する画面のphp。


・my-env/my-idp/php/Dockerfile
FROM php:7.2-fpm
COPY php.ini /usr/local/etc/php/
RUN docker-php-ext-install pdo_mysql


・my-wp/docker-compose.xml

WordPress環境のDocker-Compose設定。

version: '3'

services:
  db:
    image: mysql:5.7
    platform: linux/amd64
    volumes:
      - db_data:/var/lib/mysql
    restart: always
    environment:
      MYSQL_ROOT_PASSWORD: somewordpress
      MYSQL_DATABASE: wordpress
      MYSQL_USER: wordpress
      MYSQL_PASSWORD: wordpress

  wordpress:
    depends_on:
      - db
    image: wordpress:latest
    ports:
      - "8000:80"
    restart: always
    environment:
      WORDPRESS_DB_HOST: db:3306
      WORDPRESS_DB_USER: wordpress
      WORDPRESS_DB_PASSWORD: wordpress
volumes:
    db_data:


■4. 本環境のSAMLによる認証シーケンス