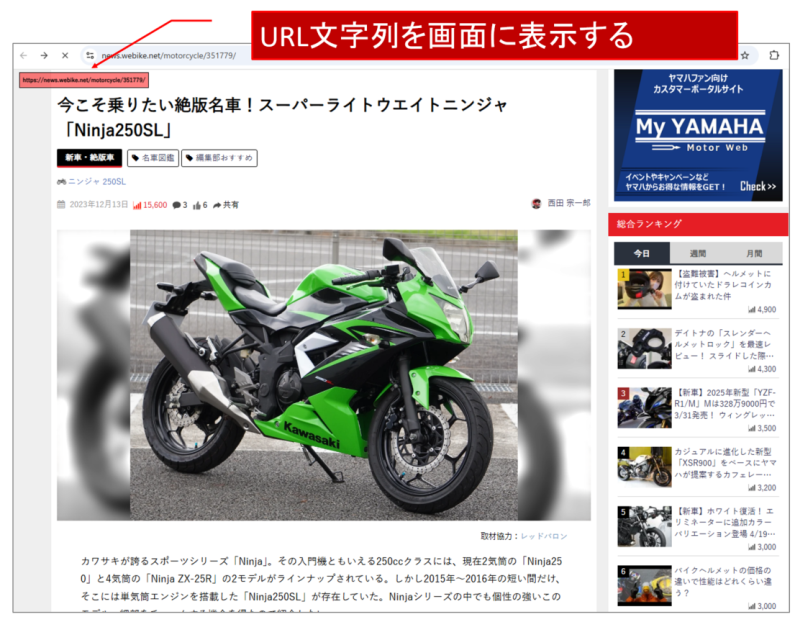
hide's memo
16 3月, 2025

Chrome拡張

[English]

URL文字列を表示するシンプルなChrome拡張のサンプル。
IT開発者がクラウドサービスを利用する際、「開発環境」「本番環境」などを視覚的にはっきり表示したい場合などに使えるかもしれません。(本番環境は「赤字」で表示するなど)


1.ファイル構成

   background.js
   contentscript.js
   contentscript.css
   manifest.json
   icons/mysample.png


2. ファイルの内容

2.1. background.js

chrome.tabs.onUpdated.addListener(function  (tabId, changeInfo, tab){
    if(changeInfo.url){
        const message = {"type": "change_url"};
        chrome.tabs.sendMessage(tabId, message);
    }
  }
);


2.2. contentscript.js

var PANEL_ID          = 'mysample_panel';
var PANEL_CLASS_LEFT  = 'mysample_panel_top_right';
var PANEL_CLASS_RIGHT = 'mysample_panel_top_left';

(function(){
    chrome.runtime.onMessage.addListener(
     async function(message, sender, callback){
       if(message.type === "change_url"){
           change_url(location.href);
       }
     }
  );
})();

window.onload = showMySamplePanel();

//----------------------------------------------------------
// [Japanese] URL文字列を表示する MY_PANEL  をDOMに追加する。
// [English]  Add "MY_PANEL" to the DOM, which shows the url string.
//----------------------------------------------------------

async function showMySamplePanel() {
    var panel = document.createElement('div');
    panel.setAttribute('id', PANEL_ID);
    panel.setAttribute('class', PANEL_CLASS_LEFT);
    panel.onmouseover = moveMySamplePanel;

    
    var message = document.createElement('p');
    message.innerText = '';
    panel.appendChild(message);
    document.body.appendChild(panel);
    change_url(location.href);
}

//----------------------------------------------------------
// [Japanese] MY_PANELの位置を変える
// [English]  Change MY_PANEL's position
//----------------------------------------------------------
async function moveMySamplePanel() {
    var panel = document.getElementById(PANEL_ID);
    var elementClass = panel.getAttribute('class');
    if (elementClass == PANEL_CLASS_RIGHT) {
        panel.setAttribute('class', PANEL_CLASS_LEFT);
    } else {
        panel.setAttribute('class', PANEL_CLASS_RIGHT);
    }
}

//----------------------------------------------------------
// [Japanese] URL文字列をセットする
// [English]  set the url string.
//----------------------------------------------------------
function change_url(url)
{
    // Change Message when the URL changed.
    var panel = document.getElementById(PANEL_ID);
    panel = document.getElementById(PANEL_ID);
    panel.textContent = url;
    panel.style.backgroundColor="rgba(255,0,0,0.5)";
}

2.3. contentscript.css

#mysample_panel {
  padding: 5px;
  border: solid 1px #000000;
  position: fixed;
  top: 5px;
  z-index: 99999;
  color: black;
  float: left;
  font-weight: bold;
  font-size: x-small;
}

.mysample_panel_top_right {
  position: fixed;
  top: 1px;
  right: 15px;
}

.mysample_panel_top_left {
  position: fixed;
  top: 1px;
  left: 15px;
}


2.4. manifest.json

{
    "manifest_version": 3,
    "name": "my sample",
    "version": "1.0",
    "description": "show url string",
    "icons": { 
        "16":  "icons/mysample.png", 
        "48":  "icons/mysample.png", 
        "128": "icons/mysample.png"
    },

    "content_scripts": [
        {
            "matches": ["https://*/*", "http://*/*"],
            "js": ["contentscript.js"],
            "css": ["contentscript.css"],
            "run_at": "document_end"
        }
    ],
    "permissions" :[
        "storage", "scripting", "tabs", "activeTab" 
    ],
    "background" : {
      "service_worker" : "background.js"
    }
}

またicons/mysample.pngとして以下のような画像ファイルも用意します。

18 4月, 2023

THREE.js (WebGL)で少し複雑なポリゴンにテクスチャを貼り付ける

[English]

THREE.js (WebGL)でメッシュにテクスチャを貼り付けるサンプル。

[demo]

(1)頂点はN x N個
(2)N x N 個の頂点を使って、三角形(Polygon)を作る
(3)頂点のZ軸の値をランダムにすることで、表面をでこぼこにする。
(4)三角形にテクスチャを貼り付ける。


ソースコード(html+javascript。three.jsが別途必要)
https://github.com/hidemiubiz/public/blob/main/Web/WebGL/sample02.html


<!DOCTYPE html>
<html>
<head>
<meta charset="UTF-8" />
<script src="three.js"></script>
<script type="text/javascript">
  window.addEventListener('DOMContentLoaded', init);

  const scene = new THREE.Scene();
  var rectangle;
  var renderer;
  var camera;

  function init() {
    const width = 600;
    const height = 400;

    renderer = new THREE.WebGLRenderer({
      canvas: document.querySelector('#myCanvas')
    });
    renderer.setSize(width, height);
    renderer.setPixelRatio(window.devicePixelRatio);

    camera = new THREE.PerspectiveCamera(45, width / height, 1, 1000);
    camera.position.set(1.5, 1.0, 1.5);
    camera.lookAt(new THREE.Vector3(0, 0.5, 0));

    rectangle = createRectangleWithTexture(20, 1);
    scene.add(rectangle);

    const light = new THREE.DirectionalLight(0xFFFFFF, 1.0);
    light.position.set(1, 1, 1);
    scene.add(light);

    const ambientLight = new THREE.AmbientLight(0x222222);
    scene.add(ambientLight);

    requestAnimationFrame(render_scene);
  }

  function render_scene()
  {
    // 物体回転させる(Rotate object)
    rectangle.rotation.y += 0.01;

    renderer.render(scene, camera);
    requestAnimationFrame(render_scene);
  }

  function createRectangleWithTexture(NUM_MESH, length){
    // ポリゴンの頂点座標の配列(Polygon's positon array)
    var pos = new Float32Array(NUM_MESH*NUM_MESH*3);
    var n=0;
    for(var y=0; y<NUM_MESH; y++){ 
      for(var x=0; x<NUM_MESH; x++){
        pos[n] = x * length/NUM_MESH; n++;
        pos[n] = y * length/NUM_MESH; n++;
        pos[n] = Math.random()*(length/NUM_MESH); n++; // ランダム値をセット(Set random value)
      }
    }

    // ポリゴンの三角形をインデックスで指定(Polugon's index array)
    n=0;
    var index = new Uint32Array(3*((NUM_MESH-1)*(NUM_MESH-1)*2));
    for(var y=0; y<NUM_MESH-1; y++){ 
      for(var x=0; x<NUM_MESH-1; x++){
        index[n] = y*NUM_MESH + x; n++;
        index[n] = y*NUM_MESH + x + 1; n++;
        index[n] = (y+1)*NUM_MESH + x + 1; n++;

        index[n] = y*NUM_MESH + x; n++;
        index[n] = (y+1)*NUM_MESH + x + 1; n++;
        index[n] = (y+1)*NUM_MESH + x; n++;
      }
    }

    // ポリゴンのTexgure位置座標の配列 (Texture uv positions array)
    n=0;
    var uvs = new Float32Array(NUM_MESH*NUM_MESH*2);
    for(var y=0; y<NUM_MESH; y++){ 
      for(var x=0; x<NUM_MESH; x++){
        uvs[n] = x/(NUM_MESH-1); n++;
        uvs[n] = y/(NUM_MESH-1); n++;
      }
    }

    // 2つの三角形をインデックスで指定(Polygon's index array)
    const geom = new THREE.BufferGeometry();
    geom.setAttribute("position", new THREE.BufferAttribute(pos, 3));
    geom.setIndex(new THREE.BufferAttribute(index,1)); 
    geom.computeVertexNormals();
    geom.setAttribute("uv", new THREE.BufferAttribute(uvs, 2));

    const texture = new THREE.TextureLoader().load("webgl_texture01.png");

    const triMat = new THREE.MeshStandardMaterial({color:0xffffff, map: texture, side:THREE.DoubleSide});
    const triMesh = new THREE.Mesh(geom, triMat);
    return triMesh;
  }

</script>
</head>
<body>
<canvas id="myCanvas"></canvas>
</body>
</html>
17 4月, 2023

THREE.js (WebGL)でシンプルなポリゴンにテクスチャを貼り付ける

[English]

THREE.js (WebGL)でシンプルなポリゴンにテクスチャを貼り付けるサンプル。

[demo]

作成するポリゴン
(1)頂点は4個
(2)4個の頂点を使って、2つの三角形(Polygon1, Polygon2)を作る(4個の頂点をIndex指定する)


(3)2つの三角形にテクスチャを貼り付ける


ソースコード(html+javascript。three.jsが別途必要)
https://github.com/hidemiubiz/public/blob/main/Web/WebGL/sample01.html

<!DOCTYPE html>
<html>
<head>
<meta charset="UTF-8" />
<script src="three.js"></script>
<script type="text/javascript">
    window.addEventListener('DOMContentLoaded', init);

    const scene = new THREE.Scene();
    var rectanble;
    var renderer;
    var camera;

    function init() {
       const width = 600;
       const height = 400;

       renderer = new THREE.WebGLRenderer({
          canvas: document.querySelector('#myCanvas')
       });
       renderer.setSize(width, height);
       renderer.setPixelRatio(window.devicePixelRatio);

       camera = new THREE.PerspectiveCamera(45, width / height, 1, 1000);
       camera.position.set(0, 0, 5);

       rectangle = createRectangleWithTexture();
       scene.add(rectangle);

       const light = new THREE.DirectionalLight(0xFFFFFF, 1.0);
       light.position.set(1, 1, 1);
       scene.add(light);

       const ambientLight = new THREE.AmbientLight(0x222222);
       scene.add(ambientLight);

       requestAnimationFrame(render_scene);
    }

    function render_scene()
    {
       // 物体回転させる(Rotate object)
       rectangle.rotation.y += 0.01;

       renderer.render(scene, camera);
       requestAnimationFrame(render_scene);
    }

    function createRectangleWithTexture(){
       // ポリゴンの頂点座標の配列(Polygon's positon array)
       const pos = new Float32Array([
          -1.0, -1.0, 0.0,
          1.0, -1.0, 0.0,
          1.0, 1.0, 0.0,
          -1.0, 1.0, 0.0
       ]);
       // 2つの三角形をインデックスで指定(Polygon's index array)
       const index = new Uint32Array([
          0,1,2, 0,2,3
       ]);

       // ポリゴンのTexgure位置座標の配列 (Texture uv positions array)
       var uvs = new Float32Array([
          0,0, 1,0, 1,1, 0,1
       ]);

       const geom = new THREE.BufferGeometry();
       geom.setAttribute("position", new THREE.BufferAttribute(pos, 3)); // ポリゴンの頂点を指定 (Set Polygon's posistion) 
       geom.setIndex(new THREE.BufferAttribute(index,1)); //ポリゴンの頂点の順番を指定(Set ordder of Polygon's position) 
       geom.computeVertexNormals(); // ポリゴンの法線を計算 (calculate polygon's normal)
       geom.setAttribute("uv", new THREE.BufferAttribute(uvs, 2)); // テクスチャの位置を指定(Set texture's UV position)

       const texture = new THREE.TextureLoader().load("webgl_texture01.png");

       const triMat = new THREE.MeshStandardMaterial({color:0xffffff, map: texture, side:THREE.DoubleSide});
       const triMesh = new THREE.Mesh(geom, triMat);
       return triMesh;
    }

</script>
</head>
<body>
<canvas id="myCanvas"></canvas>
</body>
</html>