hide's memo
26 Oct, 2025

Create an S3 on MinIO and operate it using AWS CLI

[Japanese(日本語)]

Cteate an S3 Bucket on MinIO and operate it using AWS CLI.

  • Set MinIO user, role using mc command(MinIO Client), because now MinIO Community Editon can’t allow us to set user, role using WEB Console.
  • No root account required.

■1. Install MinIO

mkdir ~/minio
cd ~/minio
wget https://dl.min.io/server/minio/release/linux-amd64/minio
wget https://dl.min.io/client/mc/release/linux-amd64/mc
chmod u+x mc
chmod u+x minio
echo "export PATH=$PATH:~/minio" >> ~/.bashrc
echo "export MINIO_ROOT_USER=minioadmin" >> ~/.bashrc
echo "export MINIO_ROOT_PASSWORD=minioadmin123" >> ~/.bashrc
source ~/.bashrc
mkdir ~/minio/minio_data


■2. Start MinIO

Start MinIO in background and set alias, user.

minio server ~/minio/minio_data &
mc alias set myminio http://localhost:9000 minioadmin minioadmin123
mc admin user add myminio s3user s3password
mc admin policy attach myminio readwrite --user=s3user


■3. Create an S3 Bucket

mc mb myminio/my-bucket


■4. Install AWS CLI

cd
curl "https://awscli.amazonaws.com/awscli-exe-linux-x86_64.zip" -o "awscliv2.zip"
unzip awscliv2.zip
echo "export PATH=$PATH:~/aws/dist" >> ~/.bashrc
source ~/.bashrc
aws configure
aws_access_key_id = s3user
aws_secret_key_id = s3password


■5. Access to the S3 Bucket usiing AWS CLI

(1)upload a file to S3.

echo "test" > minio-bucket-test.txt
aws s3 cp minio-bucket-test.txt s3://my-bucket --endpoint-url http://localhost:9000

(2)Check if the file is uploaded correctly.

aws s3 ls --recursive s3://my-bucket --endpoint-url http://localhost:9000
11 Aug, 2025

Hosgint SAML SP on IIS(using Sustainsys stub IDP)

[Japanese(日本語)]

How to create SAML SP and hosting it on IIS.
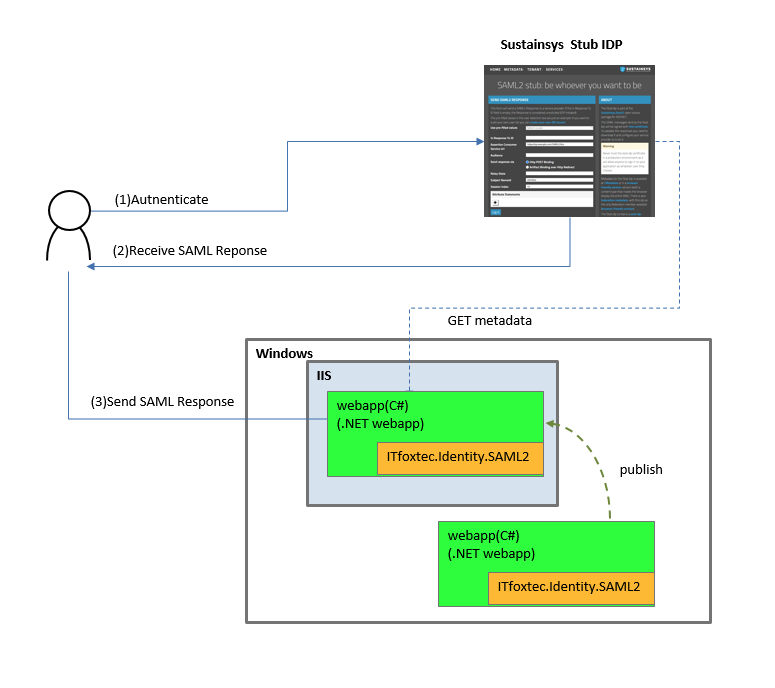
This article shows how to create SAML SP with Sustainsys’s stub IDP.

Library ITfoxtec.Identity.SAML2  (https://saml2.sustainsys.com/en/v2/#)
Environment Windows 11
Idp Sustainsys SAML IDP  (https://stubidp.sustainsys.com/)


reference https://qiita.com/urushibata/items/85eb2d0e25b3cd290e14
https://developer.okta.com/blog/2020/10/23/how-to-authenticate-with-saml-in-aspnet-core-and-csharp


■1. Install .NET SDK

Download .NET SDK and .NET Core Runtime from the link below.(You have to download the same version of .NET)
https://dotnet.microsoft.com/ja-jp/download


■2.  Create webapp

(2.1)Create the webapp using the commands below.

dotnet new webapp -o sample
cd sample
dotnet add package ITfoxtec.Identity.Saml2 --version 4.8.2
dotnet add package ITfoxtec.Identity.Saml2.MvcCore --version 4.8.2

(2.2)Add/Modify source codes below

(2.2.1) sample/appsettings.json

(Set Sustainsys Stub IDP as IdpMetadata)

{
  "Logging": {
    "LogLevel": {
      "Default": "Information",
      "Microsoft.AspNetCore": "Warning"
    }
  },
  "AllowedHosts": "*",
  "Saml2": {
     "IdPMetadata": "https://stubidp.sustainsys.com/Metadata", 
     "Issuer": "http://saml_sample/",
     "SignatureAlgorithm": "http://www.w3.org/2001/04/xmldsig-more#rsa-sha256",
     "CertificateValidationMode": "None", 
     "RevocationMode": "NoCheck"
 }
}

(2.2.2) sample/ClaimsTransform.cs
 using ITfoxtec.Identity.Saml2.Claims;
 using System.Collections.Generic;
 using System.Linq;
 using System.Security.Claims;
 
 namespace sample.Identity
 {
     public static class ClaimsTransform
     {
         public static ClaimsPrincipal Transform(ClaimsPrincipal incomingPrincipal)
         {
             if (!incomingPrincipal.Identity.IsAuthenticated)
             {
                 return incomingPrincipal;
             }
 
             return CreateClaimsPrincipal(incomingPrincipal);
         }
 
         private static ClaimsPrincipal CreateClaimsPrincipal(ClaimsPrincipal incomingPrincipal)
         {
             var claims = new List<Claim>();
 
             // All claims
             claims.AddRange(incomingPrincipal.Claims);
 
             // Or custom claims
             //claims.AddRange(GetSaml2LogoutClaims(incomingPrincipal));
             //claims.Add(new Claim(ClaimTypes.NameIdentifier, GetClaimValue(incomingPrincipal, ClaimTypes.NameIdentifier)));
 
             return new ClaimsPrincipal(new ClaimsIdentity(claims, incomingPrincipal.Identity.AuthenticationType, ClaimTypes.NameIdentifier, ClaimTypes.Role)
             {
                 BootstrapContext = ((ClaimsIdentity)incomingPrincipal.Identity).BootstrapContext
             });
         }
 
         private static IEnumerable<Claim> GetSaml2LogoutClaims(ClaimsPrincipal principal)
         {
             yield return GetClaim(principal, Saml2ClaimTypes.NameId);
             yield return GetClaim(principal, Saml2ClaimTypes.NameIdFormat);
             yield return GetClaim(principal, Saml2ClaimTypes.SessionIndex);
         }
 
         private static Claim GetClaim(ClaimsPrincipal principal, string claimType)
         {
             return ((ClaimsIdentity)principal.Identity).Claims.Where(c => c.Type == claimType).FirstOrDefault();
         }
 
         private static string GetClaimValue(ClaimsPrincipal principal, string claimType)
         {
             var claim = GetClaim(principal, claimType);
             return claim != null ? claim.Value : null;
         }
     }
 }


(2.2.3) sample/Program.cs
using ITfoxtec.Identity.Saml2;
using ITfoxtec.Identity.Saml2.Schemas.Metadata;
using ITfoxtec.Identity.Saml2.MvcCore.Configuration;

var builder = WebApplication.CreateBuilder(args);

// Add services to the container.
builder.Services.AddRazorPages();


builder.Services.Configure<Saml2Configuration>(builder.Configuration.GetSection("Saml2"));
builder.Services.Configure<Saml2Configuration>(saml2Configuration =>
{
    saml2Configuration.AllowedAudienceUris.Add(saml2Configuration.Issuer);
    var entityDescriptor = new EntityDescriptor();
    entityDescriptor.ReadIdPSsoDescriptorFromUrl(new Uri(builder.Configuration["Saml2:IdPMetadata"]));
    if (entityDescriptor.IdPSsoDescriptor != null)
    {
        saml2Configuration.SingleSignOnDestination = entityDescriptor.IdPSsoDescriptor.SingleSignOnServices.First().Location;
        saml2Configuration.SignatureValidationCertificates.AddRange(entityDescriptor.IdPSsoDescriptor.SigningCertificates);
    }
     else
     {
        throw new Exception("IdPSsoDescriptor not loaded from metadata.");
     }
 });
 builder.Services.AddSaml2();


var app = builder.Build();

// Configure the HTTP request pipeline.
if (!app.Environment.IsDevelopment())
{
    app.UseExceptionHandler("/Error");
    // The default HSTS value is 30 days. You may want to change this for production scenarios, see https://aka.ms/aspnetcore-hsts.
    app.UseHsts();
}

app.UseHttpsRedirection();     // If you don't want to force HTTPS, comment out this line.
app.UseStaticFiles();

app.UseRouting();
app.MapDefaultControllerRoute();
app.UseSaml2();

app.UseAuthorization();

app.MapRazorPages();

app.Run();


(2.2.4) sample/Controllers/AuthController.cs
using ITfoxtec.Identity.Saml2;
using ITfoxtec.Identity.Saml2.Schemas;
using ITfoxtec.Identity.Saml2.MvcCore;
using System.Collections.Generic;
using System.Threading.Tasks;
using Microsoft.AspNetCore.Authorization;
using Microsoft.AspNetCore.Mvc;
using sample.Identity;
using Microsoft.Extensions.Options;
using System.Security.Authentication;
 
 namespace sample.Controllers
 {
     [AllowAnonymous]
     [Route("Auth")]
     public class AuthController : Controller
     {
         const string relayStateReturnUrl = "ReturnUrl";
         private readonly Saml2Configuration config;
 
         public AuthController(IOptions<Saml2Configuration> configAccessor)
         {
             config = configAccessor.Value;
         }
 
         [Route("Login")]
         public IActionResult Login(string returnUrl = null)
         {
             var binding = new Saml2RedirectBinding();
             binding.SetRelayStateQuery(new Dictionary<string, string> { { relayStateReturnUrl, returnUrl ?? Url.Content("~/") } });
 
             return binding.Bind(new Saml2AuthnRequest(config)).ToActionResult();
         }
 
         [Route("AssertionConsumerService")]
         public async Task<IActionResult> AssertionConsumerService()
         {
             var binding = new Saml2PostBinding();
             var saml2AuthnResponse = new Saml2AuthnResponse(config);
 
             binding.ReadSamlResponse(Request.ToGenericHttpRequest(), saml2AuthnResponse);
             if (saml2AuthnResponse.Status != Saml2StatusCodes.Success)
             {
                 throw new AuthenticationException($"SAML Response status: {saml2AuthnResponse.Status}");
             }
             binding.Unbind(Request.ToGenericHttpRequest(), saml2AuthnResponse);
             await saml2AuthnResponse.CreateSession(HttpContext, claimsTransform: (claimsPrincipal) => ClaimsTransform.Transform(claimsPrincipal));
 
             var relayStateQuery = binding.GetRelayStateQuery();
             var returnUrl = relayStateQuery.ContainsKey(relayStateReturnUrl) ? relayStateQuery[relayStateReturnUrl] : Url.Content("~/");

             return Redirect(returnUrl);
         }
 
         [HttpPost("Logout")]
         [ValidateAntiForgeryToken]
         public async Task<IActionResult> Logout()
         {
             if (!User.Identity.IsAuthenticated)
             {
                 return Redirect(Url.Content("~/"));
             }
 
             var binding = new Saml2PostBinding();
             var saml2LogoutRequest = await new Saml2LogoutRequest(config, User).DeleteSession(HttpContext);
             return Redirect("~/");
         }
     }
 }


(2.2.5) sample/Pages/Claims.cshtml
@page
@model ClaimsModel
@{
    ViewData["Title"] = "Home page";
}

<div class="row">
    <div class="col-md-12">
        <h2>The users Claims (Iteration on User.Claims)</h2>
        <p>
            @foreach (var claim in User.Claims)
            {
                <strong>@claim.Type</strong> <br /> <span style="padding-left: 10px">Value: @claim.Value</span> <br />
            }
        </p>
    </div>
</div>


(2.2.6) sample/Pages/Claims.cshtml.cs
using System;
using System.Collections.Generic;
using System.Linq;
using System.Threading.Tasks;
using Microsoft.AspNetCore.Mvc;
using Microsoft.AspNetCore.Mvc.RazorPages;
using Microsoft.AspNetCore.Authorization;
using Microsoft.Extensions.Logging;
namespace sample.Pages
{
    [Authorize]
    public class ClaimsModel : PageModel
    {
        private readonly ILogger<ClaimsModel> _logger;
        public ClaimsModel(ILogger<ClaimsModel> logger)
        {
            _logger = logger;
        }
        public void OnGet()
        {
        }
    }
}


(2.2.7) sample/Pages/Shared/_Layout.cshtml
<!DOCTYPE html>
<html lang="en">
<head>
    <meta charset="utf-8" />
    <meta name="viewport" content="width=device-width, initial-scale=1.0" />
    <title>@ViewData["Title"] - saml_example</title>
    <link rel="stylesheet" href="~/lib/bootstrap/dist/css/bootstrap.min.css" />
    <link rel="stylesheet" href="~/css/site.css" asp-append-version="true" />
</head>
<body>
    <header>
        <nav class="navbar navbar-expand-sm navbar-toggleable-sm navbar-light bg-white border-bottom box-shadow mb-3">
            <div class="container">
                <a class="navbar-brand" asp-area="" asp-page="/Index">sample</a>
                <button class="navbar-toggler" type="button" data-bs-toggle="collapse" data-bs-target=".navbar-collapse" aria-controls="navbarSupportedContent"
                        aria-expanded="false" aria-label="Toggle navigation">
                    <span class="navbar-toggler-icon"></span>
                </button>
                <div class="navbar-collapse collapse d-sm-inline-flex justify-content-between">
                    <ul class="navbar-nav flex-grow-1">
@if (((System.Security.Claims.ClaimsIdentity)User.Identity).IsAuthenticated)
{
    <li class="nav-item">
        <a class="nav-link text-dark" asp-area="" asp-page="/Claims">SAML Claims</a>
    </li>
    <li>
        @if (User.Identity.Name != null)
        {
            <span class="navbar-text">Hello, @User.Identity.Name!</span>
        }
        else
        {
            <span class="navbar-text">Hello</span>
        }
    </li>
    <li>
        <form class="form-inline" asp-controller="Auth" asp-action="Logout">
            <button type="submit" class="nav-link btn btn-link text-dark">Logout</button>
        </form>
    </li>
}
else
{
    <li class="nav-item">
        <a class="nav-link text-dark" asp-controller="Auth" asp-action="Login">Login</a>
    </li>
}
                    </ul>
                </div>
            </div>
        </nav>
    </header>
    <div class="container">
        <main role="main" class="pb-3">
            @RenderBody()
        </main>
    </div>

    <footer class="border-top footer text-muted">
        <div class="container">
            © 2025 - saml_example - <a asp-area="" asp-page="/Privacy">Privacy</a>
        </div>
    </footer>

    <script src="~/lib/jquery/dist/jquery.min.js"></script>
    <script src="~/lib/bootstrap/dist/js/bootstrap.bundle.min.js"></script>
    <script src="~/js/site.js" asp-append-version="true"></script>

    @await RenderSectionAsync("Scripts", required: false)
</body>
</html>


■3. Build and Create publish release

(3.1)Build and crate publish release using commands below.

dotnet  build
dotnet publish --configuration Release

after commands above. you can get publish files under the path (sample¥bin¥Release¥netX.0¥publish)


■4. Add application on IIS

(4.1)Start IIS Manager
(4.2)Create new application pool(default settings)
(4.3)Right Click on “Default Web Site” and select “Add application”
(4.4)Select the app you made in (3.1)
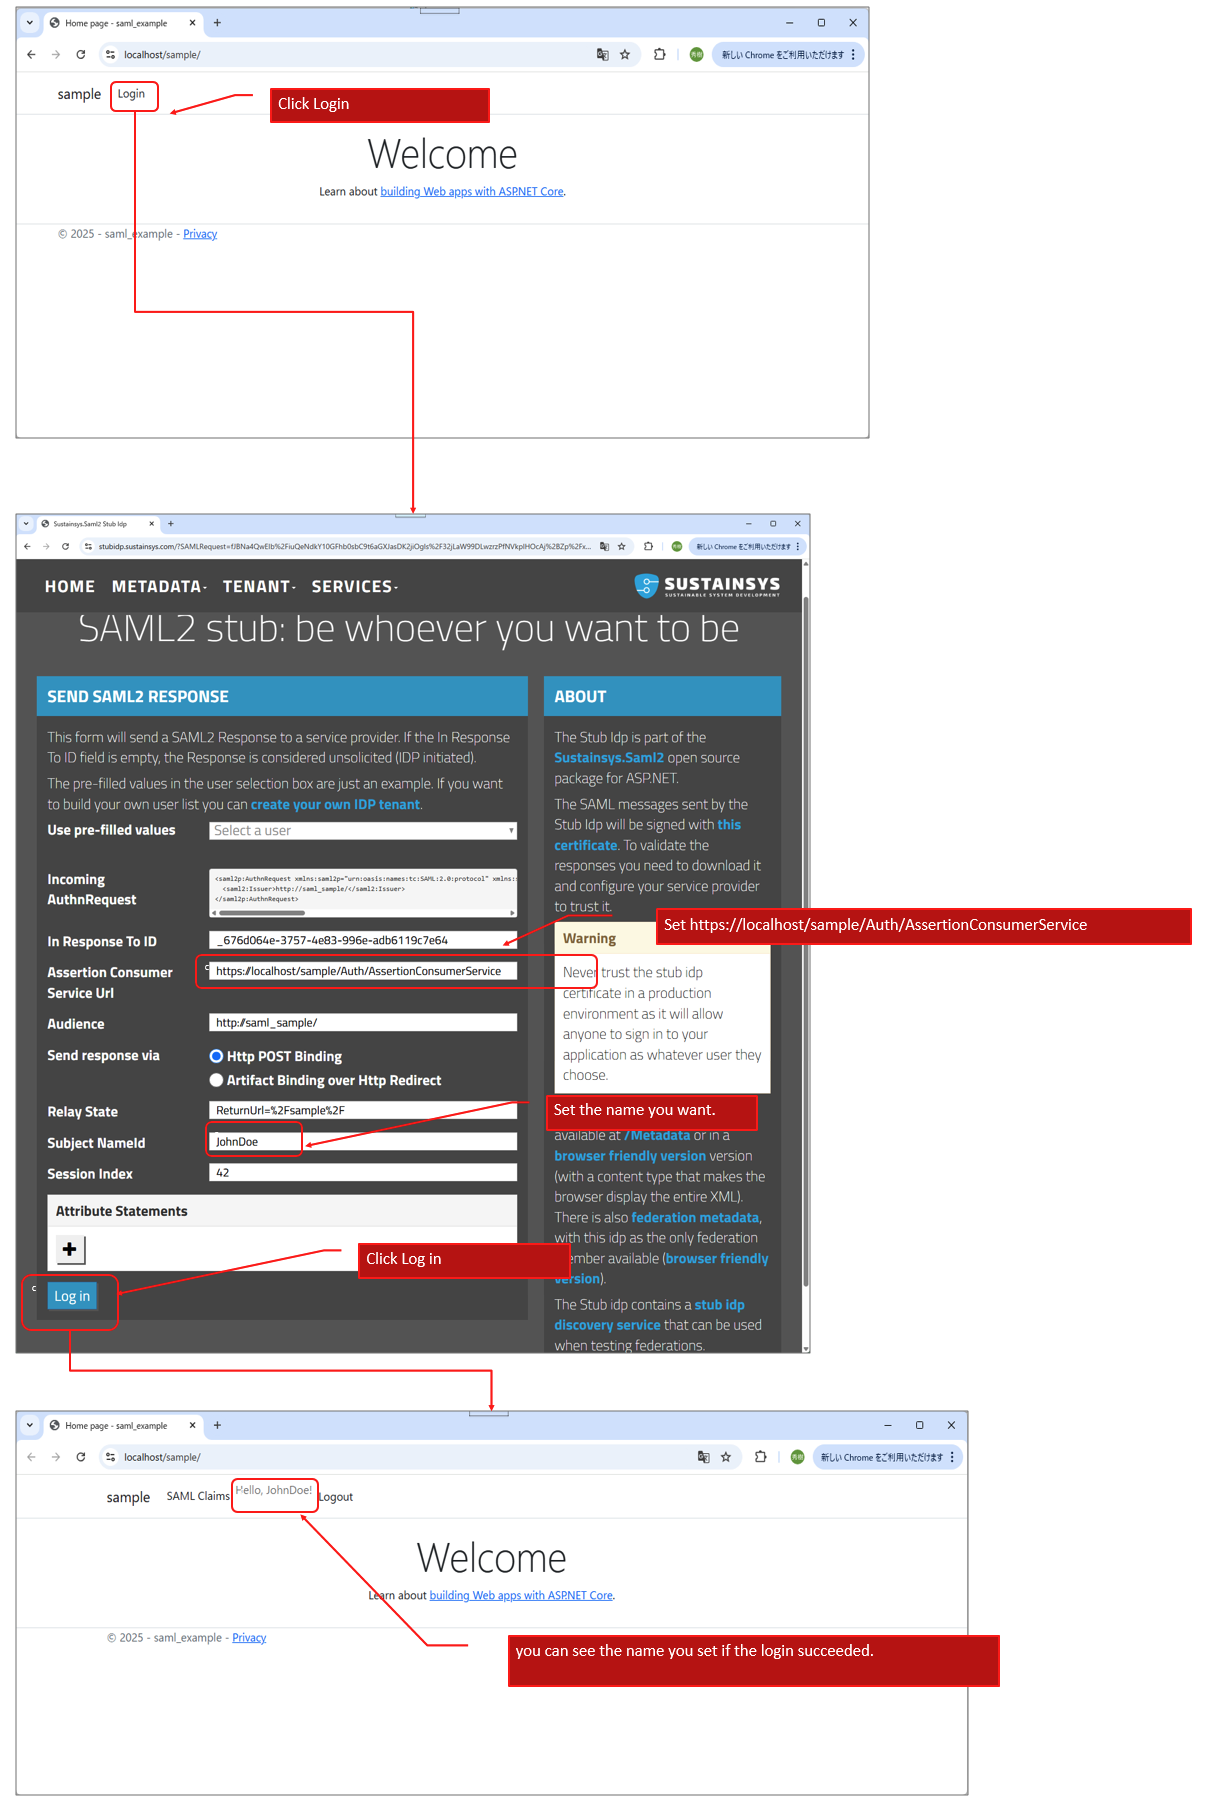


■5. How to access.

If you made the application alias as “sample”, you can access the app as follows.
(5.1)https://localhost/sample/
(5.2)Authenticate as follows.


■6. Others

(6.1) If you cann’t get the metadata

you might not be able to get the metadat if you run the app under your company’s intranet.


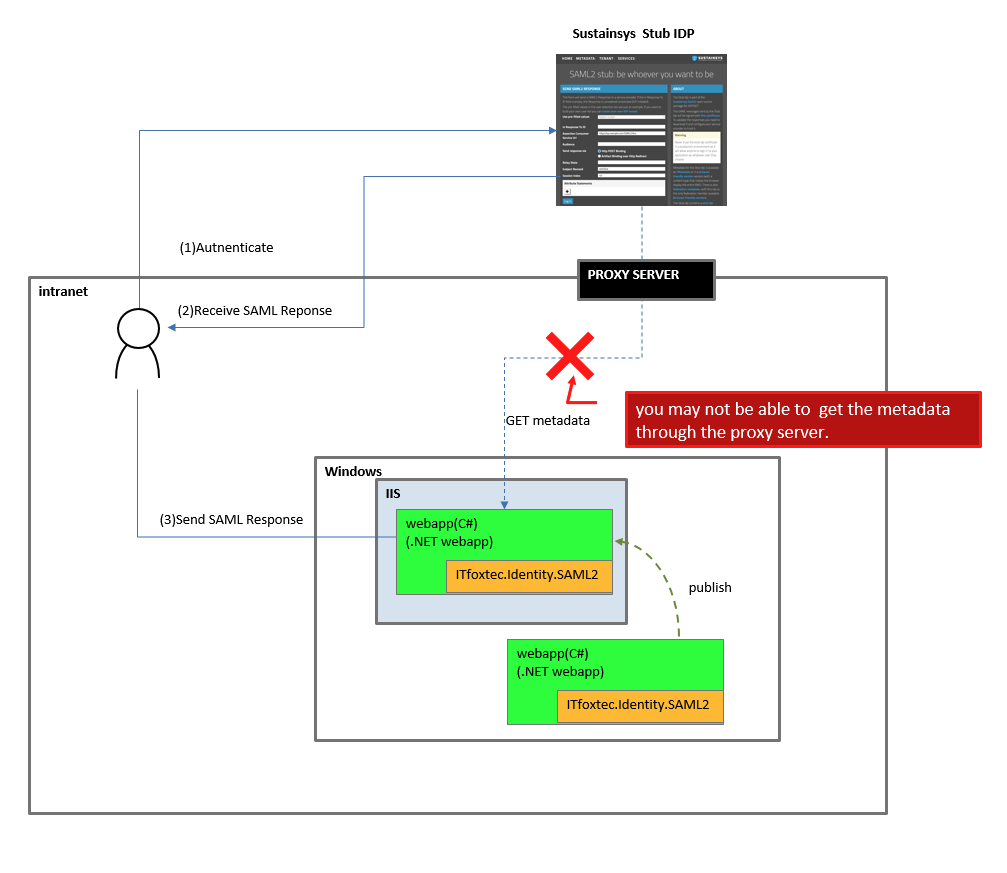
If so, you can download the metadata before and, save it as “metadata.xml”.  and then you change your application.json as follow.

{
  "Logging": {
    "LogLevel": {
      "Default": "Information",
      "Microsoft.AspNetCore": "Warning"
    }
  },
  "AllowedHosts": "*",
  "Saml2": {
     "IdPMetadata":"https://localhost/sample/metadata.xml",  // "https://stubidp.sustainsys.com/Metadata", 
     "Issuer": "http://saml_sample/",
     "SignatureAlgorithm": "http://www.w3.org/2001/04/xmldsig-more#rsa-sha256",
     "CertificateValidationMode": "None", 
     "RevocationMode": "NoCheck"
 }
}


(6.2) Validate Certification

In this article. you don’t checke the IDP’S sign. If you want vaidate the sign. you have to  download the certificate and configure your service provider to trust it.
(Warning: Never trust the stub idp certificate in a production environment as it will allow anyone to sign in to your application as whatever user they choose.)

{
  "Logging": {
    "LogLevel": {
      "Default": "Information",
      "Microsoft.AspNetCore": "Warning"
    }
  },
  "AllowedHosts": "*",
  "Saml2": {
     "IdPMetadata":"https://localhost/sample/metadata.xml",  // "https://stubidp.sustainsys.com/Metadata", 
     "Issuer": "http://saml_sample/",
     "SignatureAlgorithm": "http://www.w3.org/2001/04/xmldsig-more#rsa-sha256",
     "CertificateValidationMode": "ChainTrust", 
     "RevocationMode": "NoCheck"
 }
}
16 Mar, 2025

Chrome extension

[Japanese(日本語)]

This is a sample Chrome extension, which display the current URL string.

If you are a computer programmer using cloud services, this might help you distinguish which environment(development, production, etc…) you use.


1.Files

   background.js
   contentscript.js
   contentscript.css
   manifest.json
   icons/mysample.png


2. Surce code.

2.1. background.js

chrome.tabs.onUpdated.addListener(function  (tabId, changeInfo, tab){
    if(changeInfo.url){
        const message = {"type": "change_url"};
        chrome.tabs.sendMessage(tabId, message);
    }
  }
);


2.2. contentscript.js

var PANEL_ID          = 'mysample_panel';
var PANEL_CLASS_LEFT  = 'mysample_panel_top_right';
var PANEL_CLASS_RIGHT = 'mysample_panel_top_left';

(function(){
    chrome.runtime.onMessage.addListener(
     async function(message, sender, callback){
       if(message.type === "change_url"){
           change_url(location.href);
       }
     }
  );
})();

window.onload = showMySamplePanel();

//----------------------------------------------------------
// [Japanese] URL文字列を表示する MY_PANEL  をDOMに追加する。
// [English]  Add "MY_PANEL" to the DOM, which shows the url string.
//----------------------------------------------------------

async function showMySamplePanel() {
    var panel = document.createElement('div');
    panel.setAttribute('id', PANEL_ID);
    panel.setAttribute('class', PANEL_CLASS_LEFT);
    panel.onmouseover = moveMySamplePanel;

    
    var message = document.createElement('p');
    message.innerText = '';
    panel.appendChild(message);
    document.body.appendChild(panel);
    change_url(location.href);
}

//----------------------------------------------------------
// [Japanese] MY_PANELの位置を変える
// [English]  Change MY_PANEL's position
//----------------------------------------------------------
async function moveMySamplePanel() {
    var panel = document.getElementById(PANEL_ID);
    var elementClass = panel.getAttribute('class');
    if (elementClass == PANEL_CLASS_RIGHT) {
        panel.setAttribute('class', PANEL_CLASS_LEFT);
    } else {
        panel.setAttribute('class', PANEL_CLASS_RIGHT);
    }
}

//----------------------------------------------------------
// [Japanese] URL文字列をセットする
// [English]  set the url string.
//----------------------------------------------------------
function change_url(url)
{
    // Change Message when the URL changed.
    var panel = document.getElementById(PANEL_ID);
    panel = document.getElementById(PANEL_ID);
    panel.textContent = url;
    panel.style.backgroundColor="rgba(255,0,0,0.5)";
}

2.3. contentscript.css

#mysample_panel {
  padding: 5px;
  border: solid 1px #000000;
  position: fixed;
  top: 5px;
  z-index: 99999;
  color: black;
  float: left;
  font-weight: bold;
  font-size: x-small;
}

.mysample_panel_top_right {
  position: fixed;
  top: 1px;
  right: 15px;
}

.mysample_panel_top_left {
  position: fixed;
  top: 1px;
  left: 15px;
}


2.4. manifest.json

{
    "manifest_version": 3,
    "name": "my sample",
    "version": "1.0",
    "description": "show url string",
    "icons": { 
        "16":  "icons/mysample.png", 
        "48":  "icons/mysample.png", 
        "128": "icons/mysample.png"
    },

    "content_scripts": [
        {
            "matches": ["https://*/*", "http://*/*"],
            "js": ["contentscript.js"],
            "css": ["contentscript.css"],
            "run_at": "document_end"
        }
    ],
    "permissions" :[
        "storage", "scripting", "tabs", "activeTab" 
    ],
    "background" : {
      "service_worker" : "background.js"
    }
}

and also, You have to prepare a image file for icons/mysample.png.

16 Mar, 2025

My Earphones don’t work with just my smartphone.

[Japanese(日本語)]

I am using Google Pixel 6a and JVC HA-FX18W.
But one day, all of  a sudden. the earphones stopped working.

  • Connecting the smartphone(Google Pixel 6a) and the earphones(JVC HA-FX18W) is OK.
  • the earphones don’t play audio.
  • the connection will be closed  in 20-30 seconds.
  • the earphones works well with other devices such as my MacBook Air.
  • Making a new pairling doesn’t work well.


But, I could solve this problem with changing developer’s options.
Disabling Bluetooth A2DP hardware offload.

30 Apr, 2024

KAWASAKI ninja250SL drive-sprocket and noise

[Japanese(日本語)]

Annoying noise

I bouht a second hand KAWASAKI ninja 250 SL  in December 2023. But I was annoyed by the strange noises which become bigger when I run 5th or 6th geer. I heard the sound of iron or something scraping.I bring my motorcycle to the shop but they said that it was no problem. I was not convinced, so I researched it on the internet and I got an information.  The drive sprocket which is not a genuine parts sometimes makes a wired noise, because of lacking a rubber which makes noise easy.

I opened the sprocket cover and noticed that the previous owner changed the drive sprocket to SUNSTAR 378. And the chain guide plate was scratched abnormally. The chain guide plate was set upside down. I guess the previous owner might made a mistake.

I thought the strange noise was come from this upside down chain guide plate. I tried to run without the chain guide plate, But it still made the strange noise. I guess the chain guide plate was already fully scratched not to make the noise.

SUNSTAR 378
scratched chain guide plate. In this picture, the chain guide plate was set upside down.
You can see the chain guide plate over the cover, If you set the guide correctly.


Changing the drive sprocket

I went to a motorcycle supplies store and ordered the genuine part(KAWASAKI 13144-0577) and have it changed.
that made the strange noise gone. ( additionally, the shop clerk scrape the chain guide plate to set normally)

Before the change: You can hear the strange noise. especially around 10th seconds.

After the change:  You can’t hear the strange noise.

24 Apr, 2023

apache + perl + cgi + mysql (DBD::mysql, DBI) on MacBook M1 using Docker

[Japanese(日本語)]

This article shows how to create apache,PerlCgi and mysql(DBD::mysql, DBI) on MacBook M1 using Docker as follows.


■1. Create a Docker container.

(1.1)Get Docker image.

docker image pull amd64/ubuntu:focal

(1.2)Create a Docker container.

docker run -p 8080:80 -p 3307:3306 -it -d --name ubuntu amd64/ubuntu:focal


■2. Create Docker environment.

(2.1)Login the Docker container.

docker exec -it ubuntu /bin/bash

(2.2)Install needed applications as follows.

apt update
apt install -y apache2
    You may be asked timezone, so answer properly.
apt install -y wget
apt install -y gcc
apt install -y make
apt install -y mysql-server
apt install -y libmysqlclient-dev
apt install libssl-dev
wget https://www.cpan.org/modules/by-module/DBI/DBI-1.643.tar.gz
tar xvzf DBI-1.643.tar.gz
cd DBI-1.643
perl Makefile.PL
make
make install
cpan update
cpan install DBD::mysql
a2enmod cgid


Add 2023/4/25

you might also be able to install DBI as follows.

cpan install DBI

instead of following steps.

wget https://www.cpan.org/modules/by-module/DBI/DBI-1.643.tar.gz
tar xvzf DBI-1.643.tar.gz
cd DBI-1.643
perl Makefile.PL
make
make install


■3. Create MySQL Database and input sample data.

(3.1)Create Database and user.

mysqld_safe --user=mysql &
mysql -u root
mysql>create database mydb;
mysql>create user 'test'@localhost identified by 'test';
mysql>grant all privileges on mydb.* to 'test'@localhost;
mysql>alter user 'test'@localhost IDENTIFIED WITH mysql_native_password by 'test';
mysql>quit

(3.2)Insert sample data.

mysql -u test -p
mysql>test
mysql>use mydb;
mysql>create table m_id(id varchar(30), name varchar(30));
mysql>insert into m_id values('001','admin'); 
mysql>insert into m_id values('002','Smith'); 
mysql>insert into m_id values('003','Johnson'); 
mysql>insert into m_id values('004','Williams'); 
mysql>commit;
mysql>quit


■4. Create sample perl CGI.

(4.1)Set perl CGI file as follows.

Path:/usr/lib/cgi-bin/test.cgi
Source:

#!/usr/bin/perl
use strict;
use DBI;

my $DB_HOST="127.0.0.1";
my $DB_PORT="3306";
my $DB_NAME="mydb";
my $DB_USER="test";
my $DB_PASS="test";

sub get_db_conn()
{
  my $dbh=undef;
  eval {
    $dbh = DBI->connect("dbi:mysql:dbname=$DB_NAME;host=$DB_HOST;port=$DB_PORT","$DB_USER","$DB_PASS");
  };
  if($@){
    print STDERR "DB ERROR $@n";
    $dbh = undef;
  }
  return $dbh;
}

my $dbh = get_db_conn();
my $sql = "select id, name from m_id";
my $sth = $dbh->prepare($sql);
$sth->execute();
print "Content-type: text/html;\n\n";
print "<html>";
print "<body>";
print "<table border=1>";
while(my $ary_ref = $sth->fetchrow_arrayref){
  my($id, $name) = @$ary_ref;
  print "<tr><td>$id</td><td>$name</td></tr>";
}
print "</table>";
print "</body>";
print "</html>";


■5. Confirmation

(5.1)start apache

apachectl start

(5.2)Access the following link.
http://localhost:8080/cgi-bin/test.cgi

19 Apr, 2023

SEIKO 4R35 position accuracy

[Japanese(日本語)]

I checked SEIKO SZSB011(4R35 movement)  gain/lose every 12 hours for 1o days with changing the position.

This watch gains between 6 sec and 10 sec per 24 hours.
and loses between 15 sec and 20 sec per 24 hours.

  position    gain/lose     gain/lose per 24 hours.
  crown right       -8      -16.02
  crown right      -8     -16.53
  flat lay      +5       +9.69
  flat lay      +4       +8.36
  flat lay      +3       +6.00
  flat lay      +3       +6.03
  flat lay      +4       +7.67
  crown right      -9      -17.83
  flat lay      +3      +6.13
  flat lay      +4      +8.23
  flat lay      +4      +8.06
  crown right      -8     -15.74
  flat lay      +5      +8.99
  flat lay      +3      +6.98
  flat lay      +5      +9.22
  crown right      -8     -17.12
  crown right      -8     -16.02
  flat lay      +3      +6.03
  flat lay      +5      +9.59
  flat lay      +5      +10.13
  crown right     -10     -20.37
  crown right      -8     -15.76


18 Apr, 2023

create a mesh polygons and set a texutre image on it using THREE.js (WebGL)

[Japanese(日本語)]

This is a sample of how to create a mesh polygons and set a texture image on it.

[demo]

(1)Polygons are consist of N x N positions.
(2)Create triangles using N x N positions. Specifying index number of positions.
(3)Set random values on position’s z axis to make surface bumpy.
(4)Set a texture on those triangles as below.


source code(html+javascript。you need THREE.js)
https://github.com/hidemiubiz/public/blob/main/Web/WebGL/sample02.html


<!DOCTYPE html>
<html>
<head>
<meta charset="UTF-8" />
<script src="three.js"></script>
<script type="text/javascript">
  window.addEventListener('DOMContentLoaded', init);

  const scene = new THREE.Scene();
  var rectangle;
  var renderer;
  var camera;

  function init() {
    const width = 600;
    const height = 400;

    renderer = new THREE.WebGLRenderer({
      canvas: document.querySelector('#myCanvas')
    });
    renderer.setSize(width, height);
    renderer.setPixelRatio(window.devicePixelRatio);

    camera = new THREE.PerspectiveCamera(45, width / height, 1, 1000);
    camera.position.set(1.5, 1.0, 1.5);
    camera.lookAt(new THREE.Vector3(0, 0.5, 0));

    rectangle = createRectangleWithTexture(20, 1);
    scene.add(rectangle);

    const light = new THREE.DirectionalLight(0xFFFFFF, 1.0);
    light.position.set(1, 1, 1);
    scene.add(light);

    const ambientLight = new THREE.AmbientLight(0x222222);
    scene.add(ambientLight);

    requestAnimationFrame(render_scene);
  }

  function render_scene()
  {
    // 物体回転させる(Rotate object)
    rectangle.rotation.y += 0.01;

    renderer.render(scene, camera);
    requestAnimationFrame(render_scene);
  }

  function createRectangleWithTexture(NUM_MESH, length){
    // ポリゴンの頂点座標の配列(Polygon's positon array)
    var pos = new Float32Array(NUM_MESH*NUM_MESH*3);
    var n=0;
    for(var y=0; y<NUM_MESH; y++){ 
      for(var x=0; x<NUM_MESH; x++){
        pos[n] = x * length/NUM_MESH; n++;
        pos[n] = y * length/NUM_MESH; n++;
        pos[n] = Math.random()*(length/NUM_MESH); n++; // ランダム値をセット(Set random value)
      }
    }

    // ポリゴンの三角形をインデックスで指定(Polugon's index array)
    n=0;
    var index = new Uint32Array(3*((NUM_MESH-1)*(NUM_MESH-1)*2));
    for(var y=0; y<NUM_MESH-1; y++){ 
      for(var x=0; x<NUM_MESH-1; x++){
        index[n] = y*NUM_MESH + x; n++;
        index[n] = y*NUM_MESH + x + 1; n++;
        index[n] = (y+1)*NUM_MESH + x + 1; n++;

        index[n] = y*NUM_MESH + x; n++;
        index[n] = (y+1)*NUM_MESH + x + 1; n++;
        index[n] = (y+1)*NUM_MESH + x; n++;
      }
    }

    // ポリゴンのTexgure位置座標の配列 (Texture uv positions array)
    n=0;
    var uvs = new Float32Array(NUM_MESH*NUM_MESH*2);
    for(var y=0; y<NUM_MESH; y++){ 
      for(var x=0; x<NUM_MESH; x++){
        uvs[n] = x/(NUM_MESH-1); n++;
        uvs[n] = y/(NUM_MESH-1); n++;
      }
    }

    // 2つの三角形をインデックスで指定(Polygon's index array)
    const geom = new THREE.BufferGeometry();
    geom.setAttribute("position", new THREE.BufferAttribute(pos, 3));
    geom.setIndex(new THREE.BufferAttribute(index,1)); 
    geom.computeVertexNormals();
    geom.setAttribute("uv", new THREE.BufferAttribute(uvs, 2));

    const texture = new THREE.TextureLoader().load("webgl_texture01.png");

    const triMat = new THREE.MeshStandardMaterial({color:0xffffff, map: texture, side:THREE.DoubleSide});
    const triMesh = new THREE.Mesh(geom, triMat);
    return triMesh;
  }

</script>
</head>
<body>
<canvas id="myCanvas"></canvas>
</body>
</html>
17 Apr, 2023

Create simple polygons and set a texture image on it using THREE.js (WebGL)

[Japanese(日本語)]

This is a sample of how to create simple polygons and set a texutre image on it.

[demo]

(1)Polygons are consist of 4 positions.
(2)Create 2 triangles using 4 positions. Specifying index number of positions.


(3)Set a texture on 2 triangles as below.


source code(html+javascript。you need THREE.js)
https://github.com/hidemiubiz/public/blob/main/Web/WebGL/sample01.html

<!DOCTYPE html>
<html>
<head>
<meta charset="UTF-8" />
<script src="three.js"></script>
<script type="text/javascript">
    window.addEventListener('DOMContentLoaded', init);

    const scene = new THREE.Scene();
    var rectangle;
    var renderer;
    var camera;

    function init() {
       const width = 600;
       const height = 400;

       renderer = new THREE.WebGLRenderer({
          canvas: document.querySelector('#myCanvas')
       });
       renderer.setSize(width, height);
       renderer.setPixelRatio(window.devicePixelRatio);

       camera = new THREE.PerspectiveCamera(45, width / height, 1, 1000);
       camera.position.set(0, 0, 5);

       rectangle = createRectangleWithTexture();
       scene.add(rectangle);

       const light = new THREE.DirectionalLight(0xFFFFFF, 1.0);
       light.position.set(1, 1, 1);
       scene.add(light);

       const ambientLight = new THREE.AmbientLight(0x222222);
       scene.add(ambientLight);

       requestAnimationFrame(render_scene);
    }

    function render_scene()
    {
       // 物体回転させる(Rotate object)
       rectangle.rotation.y += 0.01;

       renderer.render(scene, camera);
       requestAnimationFrame(render_scene);
    }

    function createRectangleWithTexture(){
       // ポリゴンの頂点座標の配列(Polygon's positon array)
       const pos = new Float32Array([
          -1.0, -1.0, 0.0,
          1.0, -1.0, 0.0,
          1.0, 1.0, 0.0,
          -1.0, 1.0, 0.0
       ]);
       // 2つの三角形をインデックスで指定(Polygon's index array)
       const index = new Uint32Array([
          0,1,2, 0,2,3
       ]);

       // ポリゴンのTexgure位置座標の配列 (Texture uv positions array)
       var uvs = new Float32Array([
          0,0, 1,0, 1,1, 0,1
       ]);

       const geom = new THREE.BufferGeometry();
       geom.setAttribute("position", new THREE.BufferAttribute(pos, 3)); // ポリゴンの頂点を指定 (Set Polygon's posistion) 
       geom.setIndex(new THREE.BufferAttribute(index,1)); //ポリゴンの頂点の順番を指定(Set ordder of Polygon's position) 
       geom.computeVertexNormals(); // ポリゴンの法線を計算 (calculate polygon's normal)
       geom.setAttribute("uv", new THREE.BufferAttribute(uvs, 2)); // テクスチャの位置を指定(Set texture's UV position)

       const texture = new THREE.TextureLoader().load("webgl_texture01.png");

       const triMat = new THREE.MeshStandardMaterial({color:0xffffff, map: texture, side:THREE.DoubleSide});
       const triMesh = new THREE.Mesh(geom, triMat);
       return triMesh;
    }

</script>
</head>
<body>
<canvas id="myCanvas"></canvas>
</body>
</html>


15 Apr, 2023

If you can’t launch Docker Desktop after closing it.

[Japanese(日本語)]

My environment: M1 MacBook Air  Ventura 13.2.1

You might not be able to launch Docker Desktop from Launchpad after you close it using [x] Buton.

I guess that the Docker Desktop is still running when you close it using [x] button.

So, you might have to kill the process as follows.

(1)Search Docker Desktop process ID as folows.

ps -aef | grep -i docker | grep -i desktop | grep name
  501 19845 19811   0 10:13AM ??         0:06.63 /Applications/Docker.app/Contents/MacOS/Docker Desktop.app/Contents/MacOS/Docker Desktop --name=dashboard

(2)kill the process.

Warning!! all Docker related process are killed. So you have to launch Docker Desktop from launchpad  and start your individual docker container again.