hide's memo
13 Apr, 2023

How to create your own SAML IdP

[Japanese(日本語)]

How you do test your Web System’s Authentication, if it uses SAML Authentication?
You might want your own SAML IdP for test purpose.
This article shows how to create your own SAML IdP.


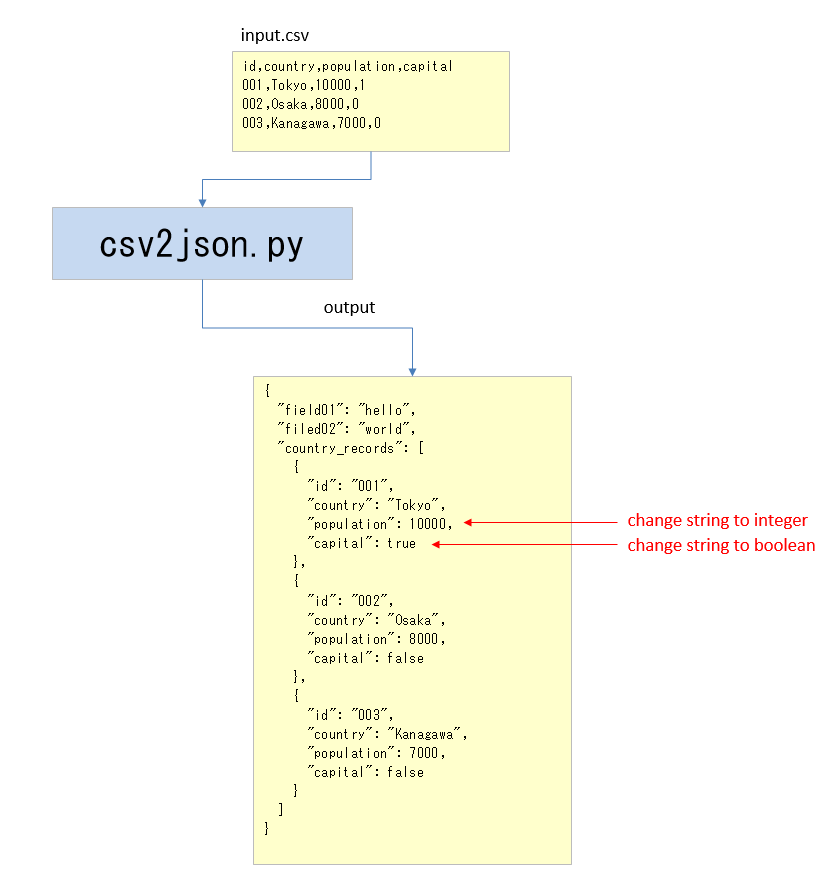
■1. Overview of your own SAML IdP environment.

Create an environment as below.

(1)Create WordPress that connect with your own IdP.
(2)Use miniOrange SAML 2.0 SSO Plugin for your WordPress.
(3)Use SimpleSAMLphp for your own IdP.
(4)Create those environment using Docker.
(miniOrange SAML 2.0 SSO Plugin for free creates new account automatically when your own Idp send the valid SAML Response)


■2. How to create the environment.

You can use archived file which contains needed files. (More on detail of these fiels later)

(1)download my-env.tgz from the link below.
https://github.com/hidemiubiz/public/blob/main/SAML/my-env.tgz
(2)Extrace my-env.tgz wherever you want to create.
(3)Create your own IdP.
(3.1)Create your own IdP using Docker Compose.

cd my-env/my-idp
docker-compose up -d

(3.2)Create public key and private key.

docker exec -it my-idp-php-1 /bin/bash
cd /var/www/html
/bin/sh prepare-env.sh

save my.crt’s content. you have to use this later.
(private key is placed in /var/www/html. this is just a demo. but you had better place this file in other folder.)

(4)Create WordPress.
(4.1)Create WordPress using Docker Compose.

cd my-env/my-wp
docker-compose up -d

(4.2)Install WordPress by following the instruction.
Access “http://localhost:8000/wp-admin” and follow the instruction to install your WordPress.
(You only have to choose the language and create 1 acccount.)

(4.3)Install SAML Plugin to your WordPress.
(4.3.1)access “http://localhost:8000/wp-admin” with using the acount that you created.
(4.3.2)Select Plugin -> New.
(4.3.3)Search “SAML” , install “SAML Single Sign On-SSO Login” and activate it.

(4.4)SAML Plugin setting .
(4.4.1)Select miniOrange SAML 2.0 SSO.
(4.4.2)Select “Service Provider Setup” tab and set parameters as follows.

Identity Provider Name: test
Idp Entity ID or Issuer: http://localhost:8080/
SAML Login URL: http://localhost:8080/mylogin.php
X.509 Certificate: 上記(3.2)でメモした公開鍵

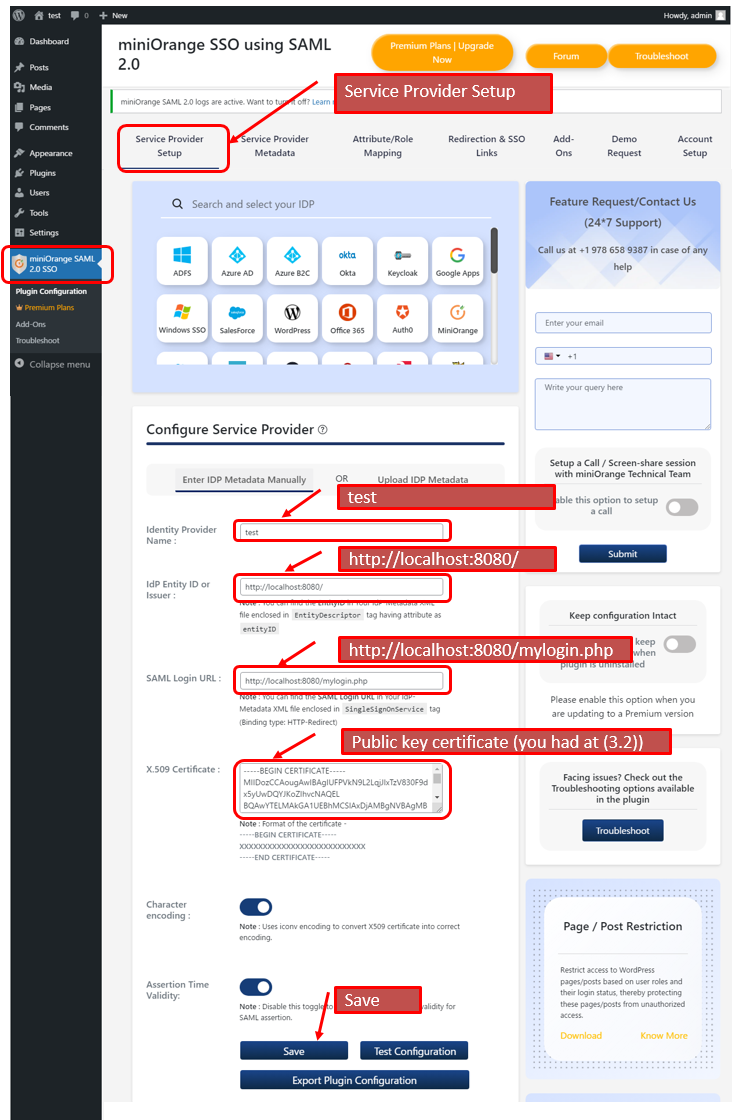
(4.4.3)Test Configuration


■3. About my-env.tgz

my-env/
  |--my-idp/
  |   |--docker-compose.yml
  |   |--php/
  |   |     |--php.ini
  |   |     |--Dockerfile
  |   |
  |   |--nginx/
  |   |     |--nginx.conf
  |   |
  |   |--www/
  |       |--html/
  |           |--mysaml.php
  |           |--mylogin.php
  |           |--makecert.sh
  |
  |--my-wp/
      |--docker-compose.yml


・my-env/my-idp/docker-compose.yml

Docker-Compose setting for my SAML IdP.

version: '3'
services:
  nginx:
    image: nginx:latest
    ports:
      - 8080:80
    volumes:
      - ./nginx/nginx.conf:/etc/nginx/conf.d/default.conf
      - ./www/html:/var/www/html
    depends_on:
      - php

  php:
    build: ./php
    volumes:
      - ./www/html:/var/www/html


・my-env/my-idp/php/php.ini
date.timezone = "Asia/Tokyo"


・my-env/my-idp/www/html/makecet.sh

Shell script to create my SAML IdP’s public key an private key.

!/bin/sh
CN=my
PASSWORD=abcdefgxyz

SJ="/C=JP/ST=Tokyo/L=Minato-ku/O=hidemiu/OU=hidemiu/CN=$CN"
openssl genrsa -des3 -passout pass:${PASSWORD} -out ${CN}.key 2048
openssl rsa -passin pass:${PASSWORD} -in ${CN}.key -out ${CN}.key
openssl req -new -sha256 -key ${CN}.key -out ${CN}.csr -subj "$SJ"
openssl req -x509 -in ${CN}.csr -key ${CN}.key -out ${CN}.crt -days 3650


・my-env/my-idp/www/html/mylogin.php

https://github.com/hidemiubiz/public/blob/main/SAML/my-env/my-idp/www/html/mylogin.php

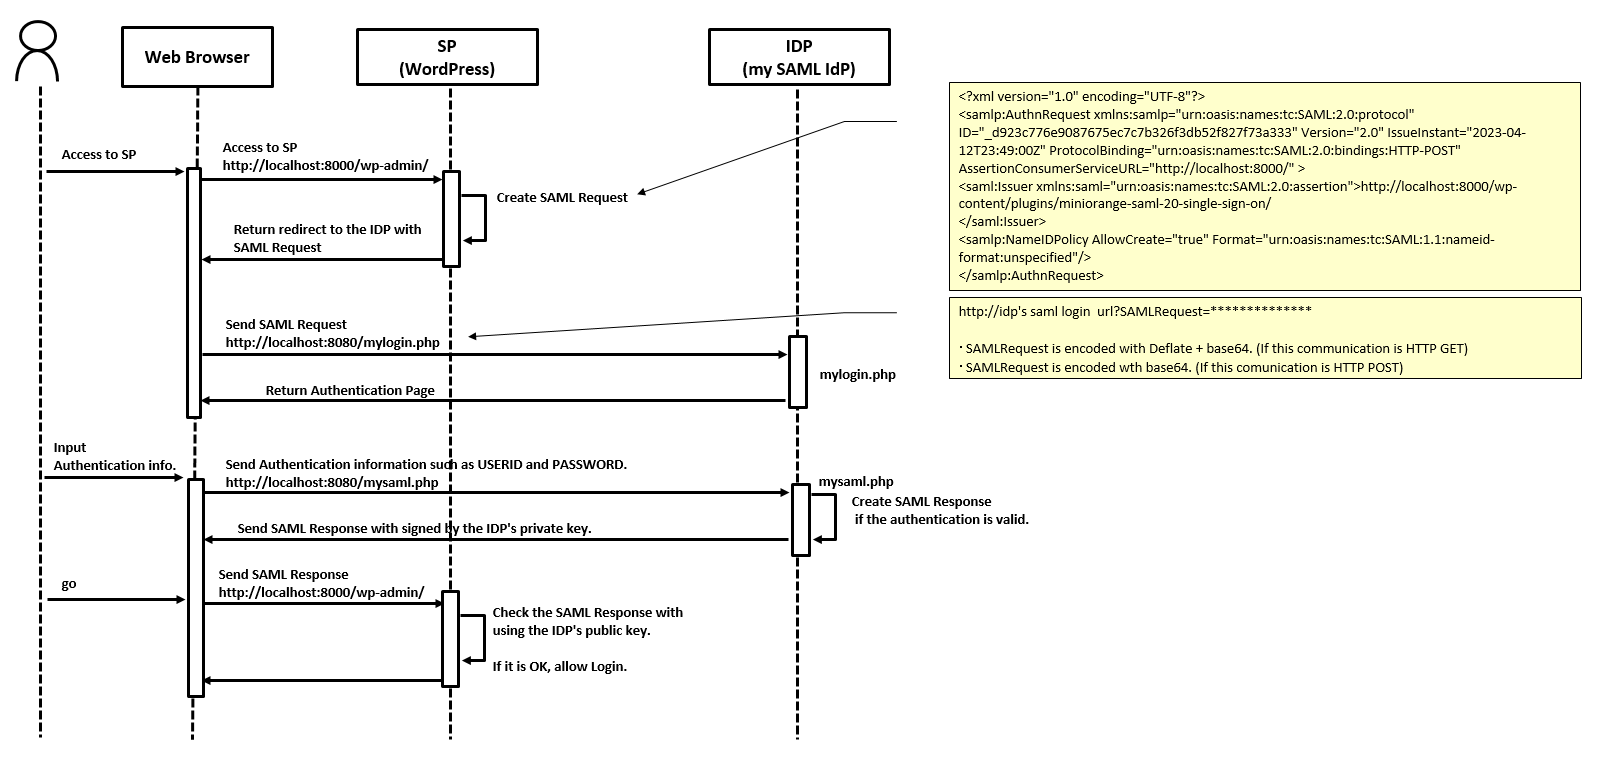
Receive SAMLRequest  from SP(WordPress). Hold the request and receive account Id that you want to login.


・my-env/my-idp/www/html/mysaml.php

https://github.com/hidemiubiz/public/blob/main/SAML/my-env/my-idp/www/html/mysaml.php

Create SAMLRequest with using Login Id and SAMLRequest, then go to SP(WordPress) login page.


・my-env/my-idp/php/Dockerfile
FROM php:7.2-fpm
COPY php.ini /usr/local/etc/php/
RUN docker-php-ext-install pdo_mysql


・my-wp/docker-compose.xml

Docker-compose setting for WordPress.

version: '3'

services:
  db:
    image: mysql:5.7
    platform: linux/amd64
    volumes:
      - db_data:/var/lib/mysql
    restart: always
    environment:
      MYSQL_ROOT_PASSWORD: somewordpress
      MYSQL_DATABASE: wordpress
      MYSQL_USER: wordpress
      MYSQL_PASSWORD: wordpress

  wordpress:
    depends_on:
      - db
    image: wordpress:latest
    ports:
      - "8000:80"
    restart: always
    environment:
      WORDPRESS_DB_HOST: db:3306
      WORDPRESS_DB_USER: wordpress
      WORDPRESS_DB_PASSWORD: wordpress
volumes:
    db_data:


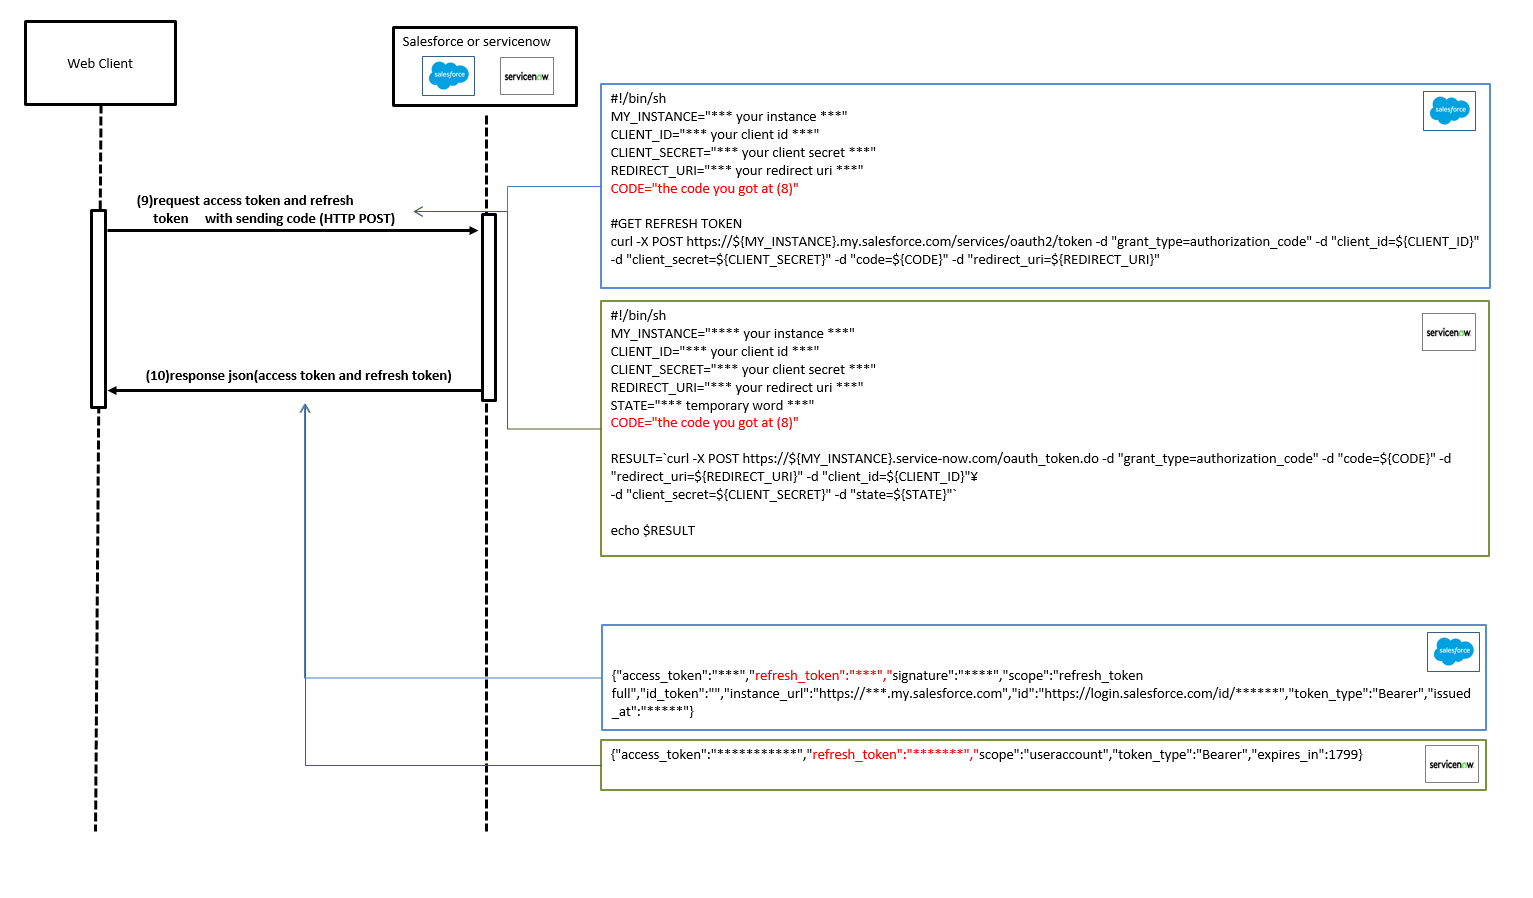
■4. SAML Authentication sequence of this environment.

9 Apr, 2023

How to get a refresh token from servicenow

[Japanese(日本語)]

How to get a refresh token from your servicenow instance with using OAuth2.0 Authorization code flow.

(1)Create endpoint on your servicenow.
(1.1)Login your servicenow instance.
(1.2)System OAuth -> Application Registory
(1.3)Push New button.
(1.4)Select “Create an OAuth API endopint for external clients”
(1.5)Apply your endpoint as below.

(2)Get Access code
(2.1)Open web browser
(2.2)Acccess the url below.


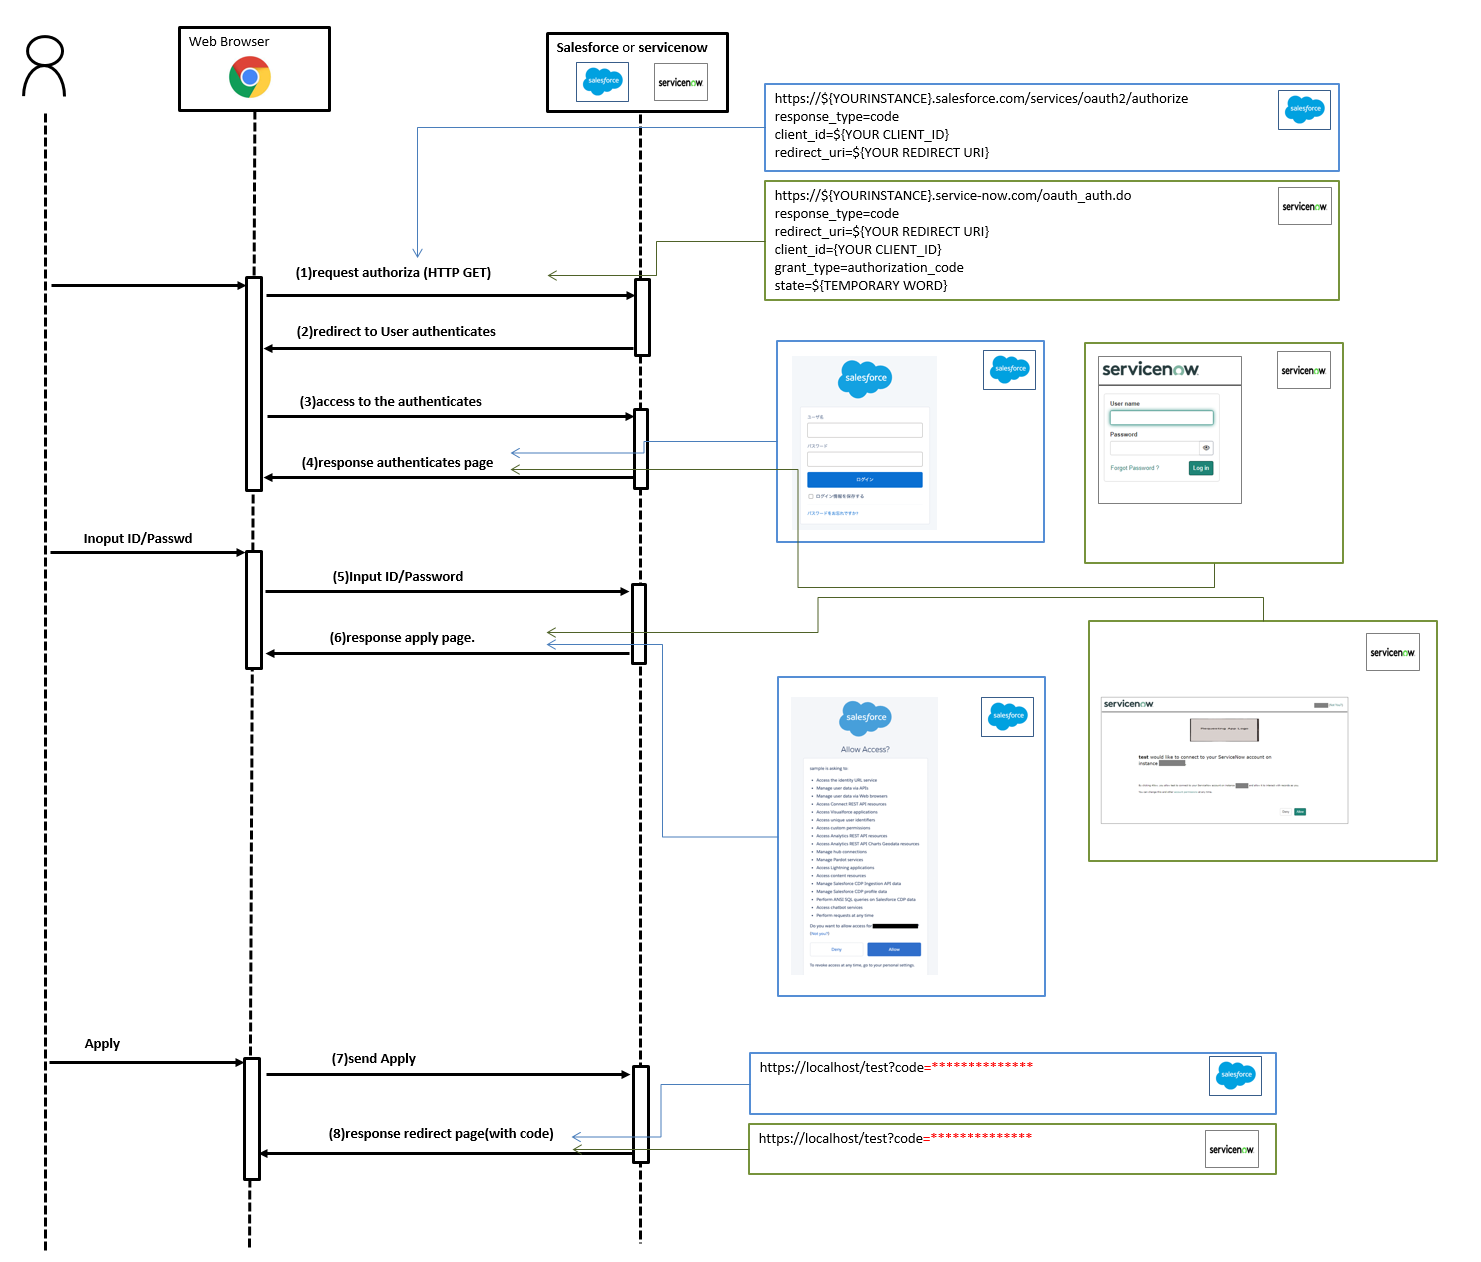
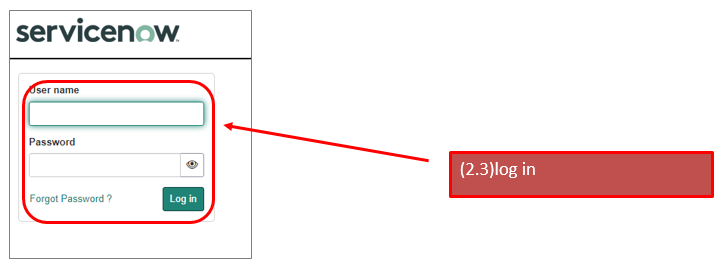
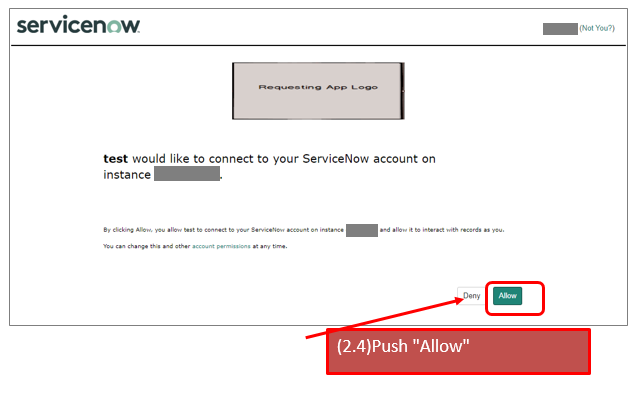
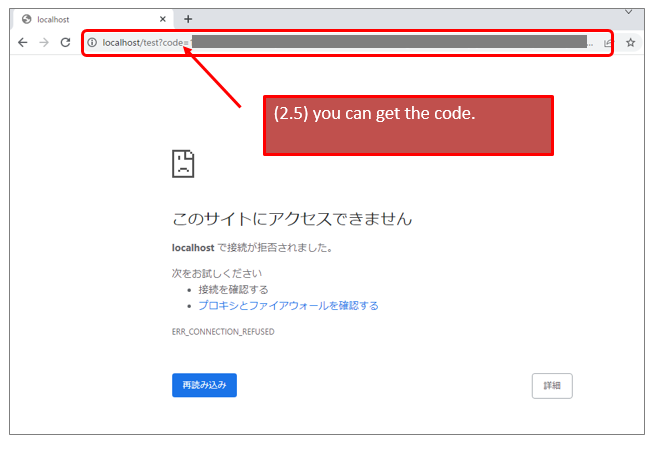
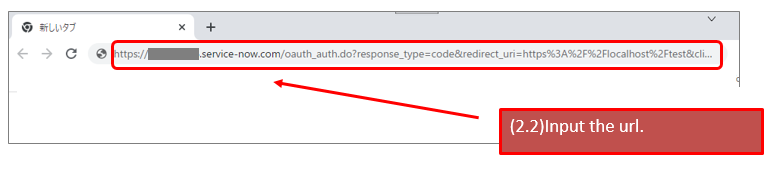
https://${YOUR_INSTANCE}.service-now.com/oauth_auth.do?response_type=code&redirect_uri=https%3A%2F%2Flocalhost%2Ftest&client_id=${YOUR_CLIENT_ID}&grant_type=authorization_code&state=123

* redirect_url ... https://localhost/test (you can apply the url that you specified on your endpoint.)
* state ... 123(you can apply your favorit word. this is just a sample)


(2.3)you can get login page.(if you don’t login your servicenow instance)


(2.4)Put “Allow” Button.


(2.5)Your redirect must be fail, but you can get the code on your address bar.


(2.6)save the code.

(3)Get Access token and Refresh token.
(3.1)prepare shell script as below.

#!/bin/sh

MY_INSTANCE="**** YOUR INSTANCE ****"
CLIENT_ID="**** YOUR CLIENT ID ****"
CLIENT_SECRET="**** YOUR CLIENT SECRET ****"
REDIRECT_URI="https%3A%2F%2Flocalhost%2Ftest" # you can apply the url that you specified on your endpoint.)
STATE="123" # specify the same word of (2.2)
CODE=$1

RESULT=`curl -X POST https://${MY_INSTANCE}.service-now.com/oauth_token.do -d "grant_type=authorization_code" -d "code=${CODE}" -d "redirect_uri=${REDIRECT_URI}" -d "client_id=${CLIENT_ID}"\
-d "client_secret=${CLIENT_SECRET}" -d "state=${STATE}"`

echo $RESULT


(3.2)exec the script above with argument of the code(sequence No.2.6)
(3.3)you can get the refresh token.

{“access_token”:”***********”,“refresh_token”:”*******”,”scope”:”useraccount”,”token_type”:”Bearer”,”expires_in”:1799}


■how to access servicenow REST-API with using Refresh token

seek the link below.

Get data from ServiceNow using curl

6 Apr, 2023

Fiddler

[Japanese(日本語)]

HTTP Packet capture tool.
you can see HTTP communications between your web browser and web server.
Additionally, you can change the HTTP request and response.


■How to see HTTP communications

(1)select the communication you want to see.
(2)select “Inspectors” tab.
(3)Select “Raw” tab.
(4)you can see HTTP request in the right upper window.
(5)you can see HTTP resonse in the right upper window.


■How to change HTTP request.

(1)Select Rules -> Automatic Breakpoints -> Before Request.
then Fiddler holds every HTTP request before sending.
(2)Choose holded HTTP communication.
(3)You can change HTTP request.
(4)Push Run to Completion Button.

As Fiddler holds every HTTP request,
You have to process every HTTP request .

■How to use Fiddler’s record to JMeter.

(1)Export Fiddler’s record as “cURL Script”.

(2)Import data to JMeter.

When you import the “cURL Script”. JMeter kindly prepare Cookie Manager which is basically required by Most Web Application.
Additionaly , you will have “View Result Tree”, So you can check the JMeter’s test result.

But, Thread Group is set with more than 10 thread.
I think you shuld better change Thred properties so that you can simply see how the test senario run.

25 Mar, 2023

Align images from right to left

[Japanese(日本語)]

How to align images from right to left.


you can set “rtl” to “p” tag’s “dir” attribute.

<html>
<body>
<p dir="rtl">
<img src="001.png">
<img src="002.png">
<img src="003.png">
<img src="004.png">
<img src="005.png">
<img src="006.png">
<img src="007.png">
</p>
</body>
</html>
18 Mar, 2023

adidas ADIZERO BOSTON 11

[Japanese(日本語)]

I bought an adidas ADIZERO BOSTON 11 on march 2023.
But, when I run with these shoes, my instep of my right foot hurts.

Even loosening the shoelace did not help.
the shoe tongue of this shoe is connected with the sole and it is very tight.
finally I cut the tongue of this shoe, and now, the shoes are very confortable for me.

16 Mar, 2023

convert csv to json

Sample src of How to convert csv to json.
You can change csv file to json.
You can also add keys, convert string to integer, convert string to boolean.

[Japanese(日本語)]


import csv
import json
import sys

#---------------------------------------
# change string(0/1) to Boolean(False/True)
#---------------------------------------
def to_boolean(s):
    if(s == ""):
        return None
    if(s == "0"):
        return False
    elif(s=="1"):
        return True
    else:
        raise ValueError("not boolean")


#---------------------------------------
# main
#--------------------------------------
args = sys.argv
jdata = {"field01":"hello", "filed02":"world", "country_records":[]}
r = open(args[1],"r")

d_reader = csv.DictReader(r)
d_list = [row for row in d_reader]

for row in d_list:
    row["population"] = int(row["population"])
    row["capital"] = to_boolean(row["capital"])

jdata["country_records"] = d_list
print(json.dumps(jdata, ensure_ascii=False, indent=2))
25 Feb, 2023

Print out excel file by VBScript

[Japanese(日本語)]

This is a sample of how to print out excel file’s cells by VBScript.
https://github.com/hidemiubiz/public/blob/main/VBS/excelparse.vbs

'-------------------------------------------------------------------
' Excelファイルの中で、文字列が入ったセルから文字列を抜き出すサンプル
' this is a sample extracting string from excel files.
'
' Usage: csript excelparse.vbs input.xls left-top-cell right-bottom-cell
' Example:
' If you want to print sample.xls's B5 to E7 celss, put the followig command.
' cscript excelparse.vbs sample.xls B5 E7
'-------------------------------------------------------------------

set objXls = CreateObject("Excel.Application")
objXls.Visible=False
objXls.ScreenUpdating=False

Dim filename
Dim left_top_cell
Dim right_bottom_cel
filename = Wscript.Arguments(0)
left_top_cell = Wscript.Arguments(1)
right_bottom_cell = Wscript.Arguments(2)

call ParseExcel(filename, left_top_cell, right_bottom_cell)

'-----------------------------------------------------
' 標準出力(Print stdout)
'-----------------------------------------------------
Function Print(m)
WScript.Stdout.Write m
End Function

'-----------------------------------------------------
' Get Full path
'-----------------------------------------------------
Function GetFullPath(ByRef filename)
GetFullPath = CreateObject("Scripting.FileSystemObject").GetAbsolutePathName(filename)
End Function

'-----------------------------------------------------
' Excelファイルをパースして出力
' print out excel file
' filename .............. excel filename パースするExcelファイル
' left_top_cell ......... left_top_cell string(example ... "B5")
' right_bottom_cell ..... right_bottom_cell string (such as "D10")
'-----------------------------------------------------
Sub ParseExcel(ByRef filename, ByRef left_top_cell, ByRef right_bottom_cell)
Dim wb,s
Dim lef_top_row
Dim lef_top_col
Dim right_bottom_row
Dim right_bottom_col

Set wb = objXls.Workbooks.Open(GetFullPath(filename))
Dim i
For i=1 To wb.Sheets.Count
Set s = wb.Sheets(i)
Set lt = s.Range("A1:" & left_top_cell)
Set rb = s.Range("A1:" & right_bottom_cell)
left_top_row = lt.Rows.Count
left_top_col = lt.Columns.Count
right_bottom_row = rb.Rows.Count
right_bottom_col = rb.Columns.Count
Call PrintRange(s, left_top_row, right_bottom_row, left_top_col, right_bottom_col)
Next
wb.Close
End Sub

'-----------------------------------------------------
' 指定された範囲のセルの文字列を表示する。
' print out specific range cells
' sheet .......... シートObject
' startRow ....... 行の開始位置(left_top_row)
' endRow ......... 行の終了位置(right_bottom_row)
' startCol ....... 列の開始位置(left_top_col)
' endCol ......... 列の終了位置(right_bottom_col)
'-----------------------------------------------------
Sub PrintRange(ByRef sheet, ByVal startRow, ByVal endRow, ByVal startCol, ByVal endCol)
Dim y
Dim x
For y=startRow To endRow
For x=startCol To endCol
Set c = sheet.Cells(y,x)
Print(c.Text & ",")
Next
Print(vbCrLf)
Next
End Sub


■How to use

if you want to print out from B5 cell to E7 cell like below image.
cscript  thissample.cbs  input.xlsx  B5  E7


31 Jul, 2022

How to UPSERT using Spark Dataframe

[Japanese(日本語)]

I am not sure if this article has any problem. If you found something wrong in this article. please let me know.

you have 2 csv data files and want to upsert as follows.

■Sampe Code No.1

df1 = spark.read.option("header","true").csv("data01.csv")
df2 = spark.read.option("header","true").csv("data02.csv")

df = df1.join(df2, ['Country','City'], 'left_anti')
df = df.unionAll(df2)

df.write.option("header","true").format("csv").save("output")


■Sample Code No.2
Another example(this code is sometimes work intensionally, But sometimes doesn’t work intensionally.
It depends on how many partitions the program execute)

df1 = spark.read.option("header","true").csv("data01.csv")
df2 = spark.read.option("header","true").csv("data02.csv")

df = df2.unionAll(df1)
df = df.dropDuplicates(['Country','City'])

df.write.option("header","true").format("csv").save("output")


■Sample Code No.3
this code will probably work intensionally(sorry, no guarantee).

df1 = spark.read.option("header","true").csv("data01.csv")
df2 = spark.read.option("header","true").csv("data02.csv")

df = df2.unionAll(df1)
df = df.dropDuplicates(['Country','City'])

df=df.coalesce(1) 
df.write.option("header","true").format("csv").save("output")


■Difference between No2. and No.3 code is the following place.

I think Spark is “Lazy Evaluation”. So, When you call the folowing code.

df = df2.unionAll(df1)
df = df.dropDuplicates(['Country','City'])

Spark Dataframe doesn’t work actually yet.It works when the following code was executed.

df.write.option("header","true").format("csv").save("output")

So, I guess the Sample Code No.3  forced Dataframe work with 1 partition,and then, dropDuplicaets() work intentionally.