hide's memo
28 Apr, 2022

How to use PostgreSQL as a sink (Azure Data Factory)

[日本語]

This is sample of how to use PostgreSQL as a sink.

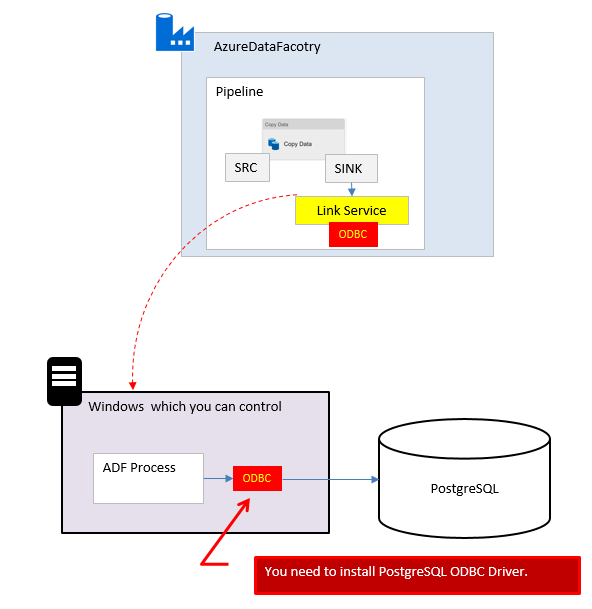
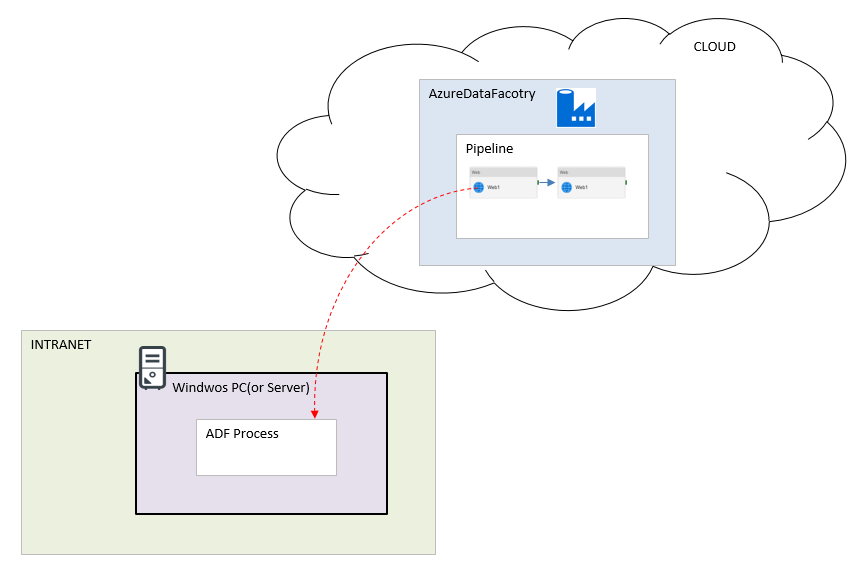
ADF can’t use PostgreSQL as a sink without using Self-hosted integration runtime.

So, at first, you need to set up a self-hosted runtime.
(See What is the Self Hosted Runtime(Azure Data Factory))

There is no PostgreSQL link service which can be used as a sink.
so you need to set “ODBC” link service.
You need to create the environment as below.


■Step1

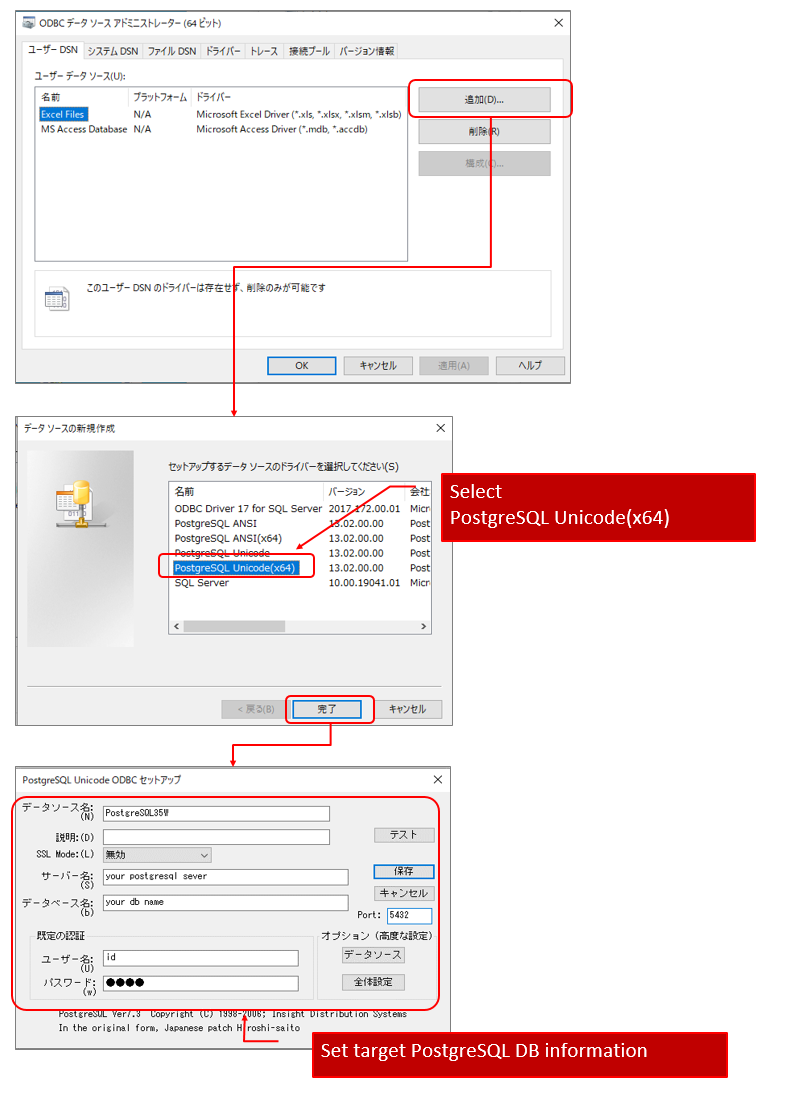
Install PostgreSQL ODBC Driver as follows.

(1)Download PostgreSQL ODBC Driver
(1.1)access https://www.postgresql.org/
(1.2)”Download” -> “File Browser” -> “odbc” -> “versions” -> “msi”
(1.3)Download psqlodbc_13_02_0000-x64.zip (at first, I tried Version 9.2. but it didn’t work)

(2)Install ODBC Driver


■Step2

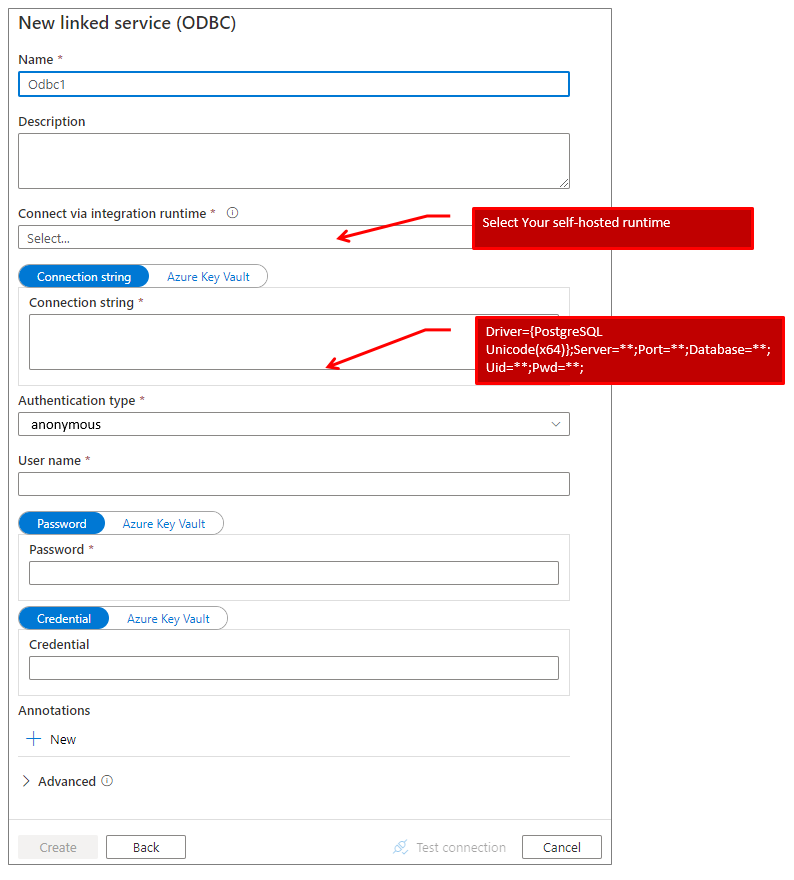
(1)Set sink’s dataset “ODBC”
(2)Set ODBC’s linked service as below.

17 Apr, 2022

DBD::mysql on MacBook Air(M1 macOS Monterey 12.0.1)

[日本語]

Actually, I did a lot of  try and error. so I am not sure the following instruction is sufficient.

You can also get information on the link below.
apache + perl + cgi + mysql (DBD::mysql, DBI) on MacBook M1 using Docker


(1)  brew install openssl
(2) add following setting on ~/.zshrc

export LIBRARY_PATH=/opt/homebrew/opt/openssl/lib
export C_INCLUDE_PATH=/Library/Developer/CommandLineTools/SDKs/MacOSX11.3.sdk/System/Library/Perl/Extras/5.30/darwin-thread-multi-2level/auto/DBI/
export CPLUS_INCLUDE_PATH=/Library/Developer/CommandLineTools/SDKs/MacOSX11.3.sdk/System/Library/Perl/Extras/5.30/darwin-thread-multi-2level/auto/DBI/

(3)source ~/.zshrc

(4)download and install DBI-1.643.tar.gz
(4.1)GET https://www.cpan.org/modules/by-module/DBI/DBI-1.643.tar.gz
(4.2)extract it on any directory you like.
(4.3)perl Makefile.PL
(4.4)make
(4.5)make install

(5) cpan install DBD::mysql


■Additional information

(1)Why you need to add some directory in ~/.zshrc

export LIBRARY_PATH=/opt/homebrew/opt/openssl/lib

-> If you don’t add the path above. you will encounter the following error, when “cpan install DBD::mysql”
“Can’t link/include C library ‘ssl’, ‘crypto’, aborting.”

export C_INCLUDE_PATH=/Library/Developer/CommandLineTools/SDKs/MacOSX11.3.sdk/System/Library/Perl/Extras/5.30/darwin-thread-multi-2level/auto/DBI/
export CPLUS_INCLUDE_PATH=/Library/Developer/CommandLineTools/SDKs/MacOSX11.3.sdk/System/Library/Perl/Extras/5.30/darwin-thread-multi-2level/auto/DBI/

-> If you don’t add the path above. you will encounter the following error.
‘DBIXS.h’ file not found

Why you need to install DBI-1.643.tar.gz
->I followed the information below.
https://stackoverflow.com/questions/68774807/dbdmysql-installation-on-catalina-big-sur-fail-with-extern-h-file-not-found


If you want to create the environment using Docker.

See the following link.

apache + perl + cgi + mysql (DBD::mysql, DBI) on MacBook M1 using Docker

7 Apr, 2022

How to get a Refreshtoken. (Refresh token is valid for 365 days) Salesforce.

[日本語]

This is a sample for getting the refresh token from saleforce.

(1)Login Salesforce

(2)Change Classc UI (I am not sure hot to do this by Lightning Expreience)

(3)”Setup” -> “Build – Create – Apps” -> Click “Create Apps New” Button.

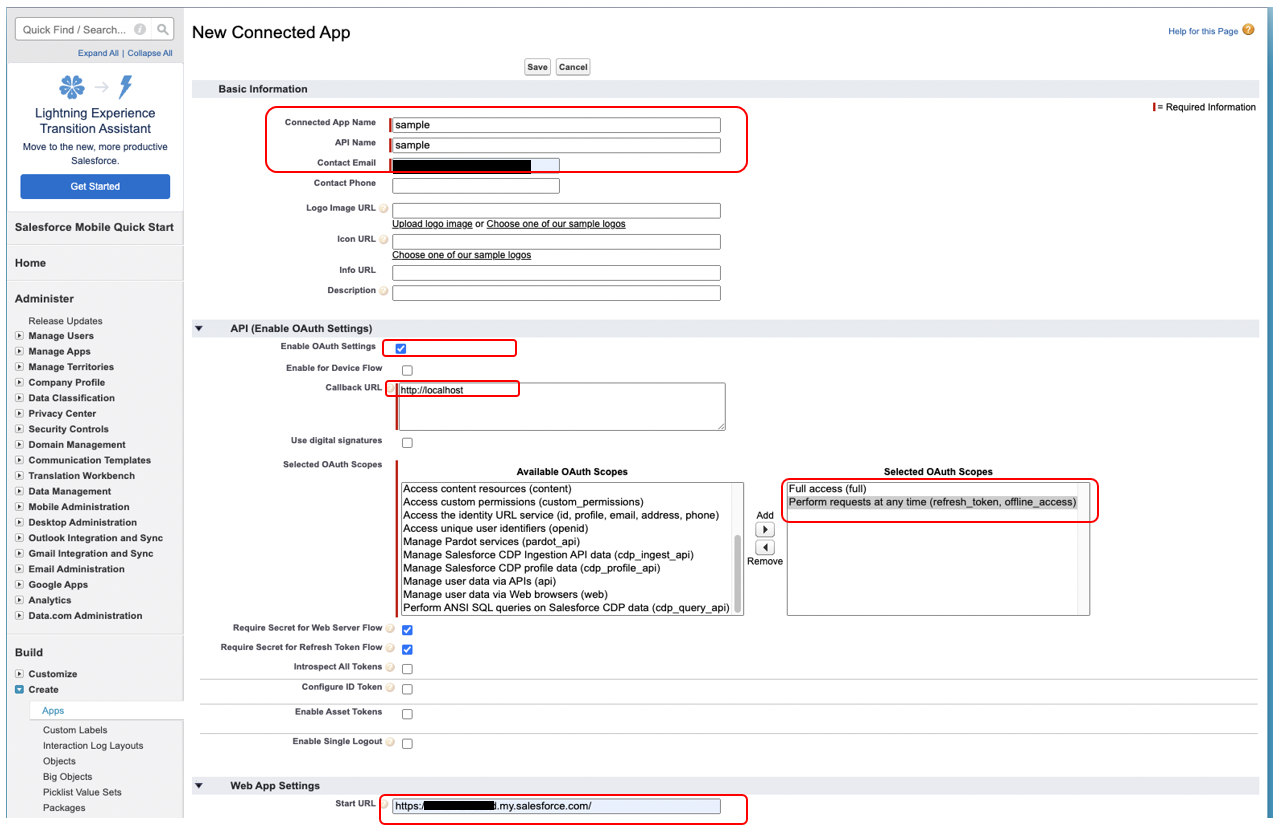
(4)Input parameters as brlow.


(4.1)Connected App Name …. “sample”

(4.2)API Name ….. “sample”

(4.3)Contact Email …. your email address.

(4.4)Check “Enable OAuth Settings”

(4.5)Set “http://localhost” in “Calllback URL”

(4.6)Selected OAuth Scope … “Full access” + “Perform requests at any time(refresh_token,offline_access)..
warning!! this is sample. you should check this permission carefully.

(4.7)Set your salesforce address in “Start URL”

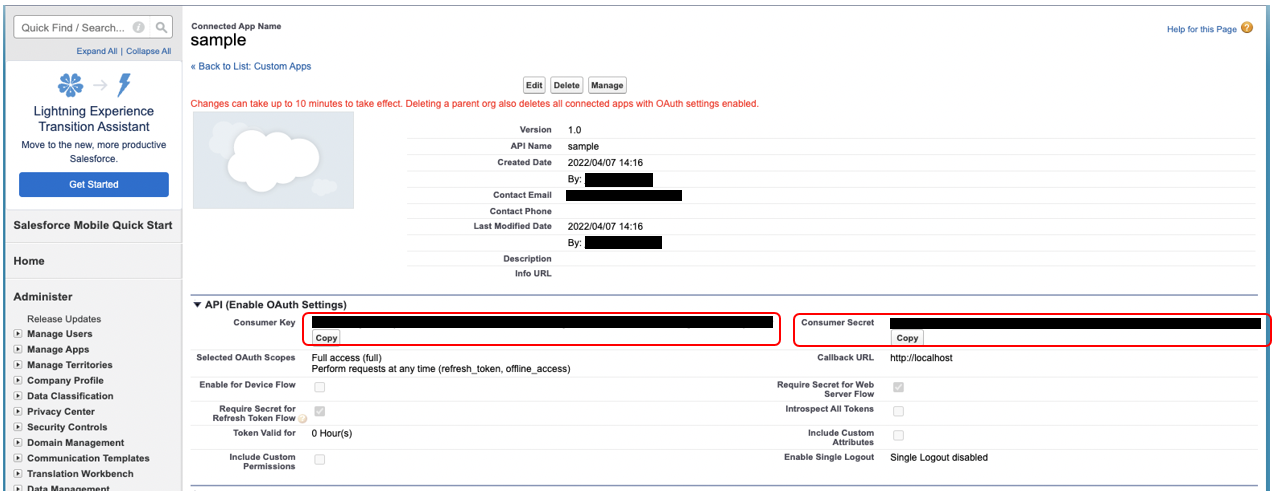
then, “Save” and Copy next form’s “Consumer Key” and “Consumer Secret”


(5)”Setup” -> “Administer – Manage Apps – Connected Apps”
(5.2)select “sample”

(5.1)”Edit Policies”

(5.2)”Refresh token policy” : Set “Expire refresh token after 365 days.”

(6)Input the url bellow on the web broweer which you are currently using(currently accsssing the salesforce(having web session))

https://****.my.salesforce.com/services/oauth2/authorize?response_type=code&client_id=****&redirect_uri=http%3A%2F%2Flocalhost

* Set your salesforce server name.
* client_id …. your “consumer key”

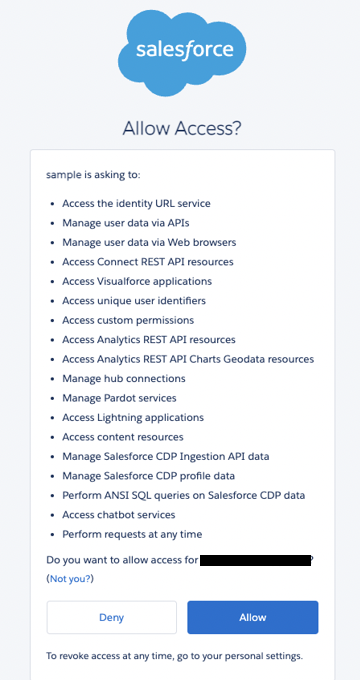
(6.1)You will be confirmed as below message and select “Allow”


(7)you will be redirected to the following url.
http://localhost/?code=*****
so, save the code.

(8)write a shell as below.

#!/bin/sh
CLIENT_ID="consumer key"
CLIENT_SECRET="consumer secret"
SERVER="yourserver****.my.salesforce.com"
CODE="the code you got at (7)"

#GET REFRESH TOKEN
curl -X POST https://$SERVER/services/oauth2/token -d "grant_type=authorization_code" -d "client_id=$CLIENT_ID" -d "client_secret=$CLIENT_SECRET" -d "code=$CODE" -d "redirect_uri=http%3A%2F%2Flocalhost"


execute the shell above, you can get the response as below.

{"access_token":"***","refresh_token":"***","signature":"****","scope":"refresh_token full","id_token":"","instance_url":"https://***.my.salesforce.com","id":"https://login.salesforce.com/id/******","token_type":"Bearer","issued_at":"*****"}


5 Mar, 2022

Get Record with using REST-API(SELECT) Salesforce

[japanese(日本語)]

This is sample for getting record from Salesforce with using REST-API(SELECT).

Get record from User Object.Name with LastUpdated > 2022/3/5 15:03:00(JST).

The “$ACCESS” in the below sample is  a access token that you can get with using this method(Get data from Salesforce using curl Salseforce).

DATE="2020-03-05T15%3A03%3A00%2B09%3A00"
curl -H "Authorization: Bearer $ACCESS" "https://$SERVER/services/data/v50.0/query/?q=SELECT+Name+from+User+where+LastModifiedDate%3E$DATE"


Get Name,Fax,Division and Signature.

DATE="2020-03-05T15%3A03%3A00%2B09%3A00"
curl -H "Authorization: Bearer $ACCESS" "https://$SERVER/services/data/v50.0/query/?q=SELECT+NAME%2CFax%2CDivision%2CSignature+from+User+where+LastModifiedDate%3E$DATE"
28 Feb, 2022

NTML Authentication and PROPFIND to DAV sample code for ASP.NET

[japanese(日本語)]

NTML Authentication and PROPFIND to DAV sample code for ASP.NET AST.NET

Imports System.Net
Imports System.IO
Imports System.Configuration
Imports System.Data
Imports System.Text

Partial Class _Default
    Inherits System.Web.UI.Page
    Protected Sub Button1_Click(ByVal sender As Object, ByVal e As System.EventArgs) Handles Button1.Click
        Dim req As System.Net.HttpWebRequest = CType(System.Net.WebRequest.Create("http://hogehoge.com/hoge/hoge/"), System.Net.HttpWebRequest)
        req.Credentials = New System.Net.NetworkCredential(TextBox1.Text, TextBox2.Text)
        req.Method = "PROPFIND"
        req.ContentType = "text/xml"

        Dim res As System.Net.HttpWebResponse = CType(req.GetResponse(), System.Net.HttpWebResponse)

        Dim st As System.IO.Stream = res.GetResponseStream()
        Dim sr As New System.IO.StreamReader(st)
        Dim txt As String = sr.ReadToEnd()
        sr.Close()
        st.Close()
        TextBox3.Text = txt
    End Sub
End Class
27 Feb, 2022

using a lot of individual accounts on JMeter

[japanese(日本語)]

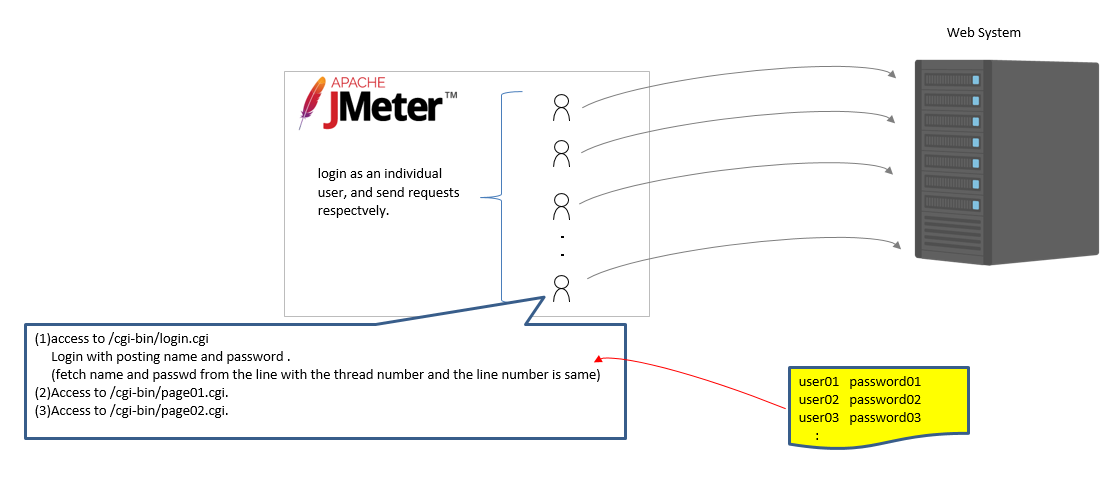
Prepare a lot of indivisual accounts and each of them access to the web system.


1.Prepare a text file including ID,Passwod

This file is delimitered by “tab” as follows.

user001 passwd001
user002 passwd002
user003 passwd003


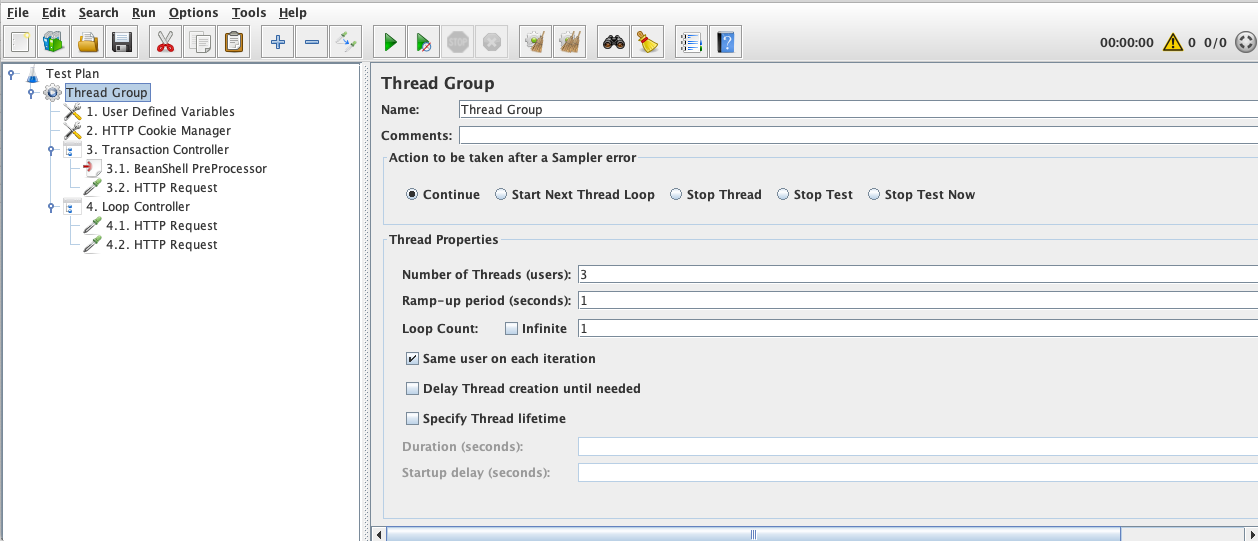
2. Set JMeter As follows


(1)User Defined Variable

Add uid,passwd.

(2)Add HTTP Cookie Manager.

(3)Add Transaction Controller.

(3.1.)Add BeahShell PreProcessor. Write code as follows.

int threadNum = ${__threadNum}; 
String filename = "users.txt"; // wirte file name as full path.

String data;
BufferedReader br = new BufferedReader(new FileReader(filename));
String uid="";
String passwd="";

int num=0;
while((data = br.readLine())!=null){
  String[] token = data.split("t");
  uid = token[0];
  passwd = token[1];

  num++;
  if(num == threadNum){
    break;
  }
}
br.close();

vars.put("uid",uid);
vars.put("passwd",passwd)


(3.2) Add HTTP Request

This example assumed to login with posting uid and passwd .

Access URL:http://localhost/cgi-bin/login.cgi

HTTP Request:POST

Add Parameters  as follows

uid    ${uid}

passwd    ${passwd}


(4)Add Loop Controller

(4.1)Add HTTP Request

(4.2)Add HTTP Request


You can increse the number of Threads as many as the “user.txt” files line.


26 Feb, 2022

Despite SSL offroading on the Load balancer, Spoofing Web Applications as being accessed by HTTPS . (URLRewrite,IIS)

[japanese(日本語)]

Despite SSL offroading on the Load balancer, Spoofing Web Applications as being accessed by HTTPS .


  1. Install URLRewrite module to IIS
  2. on the URL Rewrite module setting, Add “HTTPS” on “server variables”
  3. write web.config as follows.
<?xml version="1.0" encoding="utf-8"?>
<configuration>
<system.webServer>
<rewrite>
   <rules>
       <rule name="backend" patternSyntax="Wildcard">
           <match url="*" />
           <serverVariables>
               <set name="HTTPS" value="on" />
               </serverVariables>
           <action type="None" />
       </rule>
   </rules>
</rewrite>
</system.webServer>
</configuration>


20 Feb, 2022

apache+perl+cgi on termux

[japanese(日本語)]


1.Install temrux

Install termux on PlayStore.


2.install apache,perl

apt update
apt upgrade
apt install apache2
apt install perl


3. modify httpd.conf

file:/data/data/com.termux/files/usr/etc/apache2/httpd.conf

<Directory /data/data/com.termux/files/usr/lib/cgi-bin>
</Directory>

Add options to the  above section as follows.

Options +ExecCGI


uncomment the following line.

AddHandler cgi-script .cgi


modify httpd.conf  to load mod_cgi module as follows.

<IfModule mpm_prefork_module>
    #LoadModle cgi_module libexec/apache2/mod_cgi.so
</IfModule>

#<IfModule mpm_prefork_module>
    LoadModle cgi_module libexec/apache2/mod_cgi.so
#</IfModule>


4. confirmation (confirm to work printenv)

4.1. add execute permisision

chmod ugo+x /data/data/com.termux/files/usr/lib/cgi-bin/printenv

4.2.add the line as follows into printenv

#!/usr/bn/perl


5. start apache

apachectl


6. access to the local web server on android as follows.

http://localhost:8080/

http://localhost:8080/cgi-bin/printenv